


Low-code Weather Marketing Campaigns with Voucherify, AerisWeather, Zapier, Segment, Braze, and Twilio
Table of Contents:
- What is weather-based marketing?
- Local weather-based campaign:
- Import customer to Voucherify.
- Build customer segment.
- Create public codes.
- Share codes with customers via Twilio.
- Build Zapier <> AerisWeather automation.
- Design three paths in Zapier that activate/deactivate the public codes based on the weather conditions.
- Global weather campaign:
- Add metadata to customer profiles in Voucherify.
- Build customer segments based on metadata.
- Model the discount & gift card campaigns.
- Create Braze distribution.
- Connect Segment with Braze, Voucherify and Zapier.
- Build a Zap.
- Track the progress of your campaigns with Voucherify.
What is weather-based marketing?
Weather marketing (also weather-based marketing or weather triggered marketing) is powerful marketing automation that utilizes real-time weather data to trigger ads and personalize marketing messages based on the local weather.
Why should you base your messaging and promotions on the weather? A 2010 study by economist Kyle B. Murray revealed that exposure to sunlight could increase consumption and our likelihood to spend. On the other hand, during dreary, cold, or stormy days, buyers are more reluctant to purchase. The weather is a universal driver of consumer purchase behavior and receptiveness to marketing messages. Marketers know that weather has a tremendous bearing on what actions consumers take – where they go and how they travel, what food they eat, what clothes they wear, what products and services they buy, and finally, how much they are ready to spend.
A couple of examples of weather-based marketing campaigns:
- Starbucks targeted digital ads based on current weather signals, aligning content and weather conditions with messages such as “It’s a warm one today! Come in and cool off with Starbucks.”
- Pantene promoted its anti-frizzing hair products to consumers in areas where humidity is peaking and its volumizing hair products in drier regions.
- Timberland used a three-day weather forecast to drive customers to purchase rainwear.
- Coop released fondue cheese ads in the Swiss radio based on the weather forecast, advertising primarily on colder days.
Imagine that you would like to release several dynamic promo campaigns based on weather forecasts and customers’ geolocation. What might look like a simple flow is a literal minefield of technical issues. Prominent market players such as Starbucks or Timberland can engage multiple departments in building such a flow. But what if you don’t have that time, money, and workforce to spare? Luckily, low-code SaaS platforms can come to your rescue.
This article will show you how to set-up two weather-based campaigns with little to no coding knowledge required, using out-of-the-box features of well-known SaaS platforms. The first campaign is a better fit for local businesses, while the second is targeted at international companies. Here is the promotion mechanism we will use:
Berlin café – local weather campaign
- If it is snowing in Berlin, enable a -20% public coupon in our store.
- If it is snowing and the temperature dropped below -15°C in Berlin, enable a -50% public coupon.
- If it is not snowing, disable both offers.

Global weather campaign for an online coffee store – Let is snow
- If it is snowing in the user location, the users will get a personal, one-off coupon for a free thermos, redeemable if their order is above $50.
- If it is snowing and the temperature is below -15°C in the user location, the users will get a $40 gift card valid for orders above $100.
We will use headless platforms to come up with a working proof of concept for the campaigns.
- Geolocation Web API
- Zapier <> AerisWeather – Automation API
- Segment — Customer Data Platform
- Voucherify – Promotion Management Software
- Braze – Email Marketing
- Twilio – Mobile Marketing
By using these best-of-class headless services and a bit of custom code, you can dramatically reduce your time-to-market and development costs. If this is the first time you’ve met with headless platforms, you might find this article interesting.
Note: To ensure that this flow is successful, you need to connect your store with these apps.
Berlin café – local weather campaign
Businesses have been hit hard by the COVID-19 health crisis. To help companies develop creative and easy-to-setup campaigns, we have decided to model a flow for a weather-based campaign for Berlin customers.
Here is the promotion logic:
- If it is snowing in Berlin, enable a -20% public coupon in our store.
- If it is snowing and the temperature dropped below -15°C in Berlin, enable a -50% public coupon.
- If it is not snowing, disable both offers.
Here is what we are going to do step-by-step:
- Import our customer base to Voucherify (ensure that customer profiles include location and phone number).
- Build a segment for customers from Berlin.
- Create two standalone codes for -20% and -50% with a customized code pattern.
- Share the code with customers via Twilio integration.
- Go to Zapier and build a connection with AerisWeather.
- Ask AerisWeather to check the weather in Berlin every day at 7 am.
- If the promotion conditions are met, Zapier sends a POST request to Voucherify to enable vouchers.
- If the weather conditions are not met, Zapier via a POST request disables the standalone codes.
Voucherify – All-in-One Promotion Engine
Note: To start a free trial of Voucherify, follow this link.
Voucherify is an API-first promotion engine that supports multiple promotion types. We are going to use Voucherify to:
- Import customers via a CSV file.
- Build a segment for customers from Berlin.
- Create two standalone codes for -20% and -50%.
- Share codes with customers via Twilio integration.
Import customers
Open your Voucherify account and find the Customers tab to your left. With a CSV file ready, click the CSV import button and start mapping customer attributes into Voucherify. For production-ready campaigns, you should synchronize your customer records via API integration or Segment.io (presented in the second scenario).
Remember that we need the location and a phone number for this workflow.

Confirm the mapping. You will be notified when the import is ready.

Build a segment for Berlin customers
Depending on the number of imported customer data, the import may take up to several minutes. With customer profiles already in the Voucherify, proceed to build a segment (group) for customers from Berlin.
- Name the customer group.
- Choose the auto-update mode (new customers will be added automatically).
- Select the conditions – City is Berlin.
Reload the customers’ list to see how many users qualify for the group and save your segment.
Create public codes
Move to the Campaigns tab and generate a new standalone code. Standalone codes are public discount codes shared via multiple channels. Choose the discount coupons and standalone code as your type. Customize the code pattern, e.g., SNOW2020.
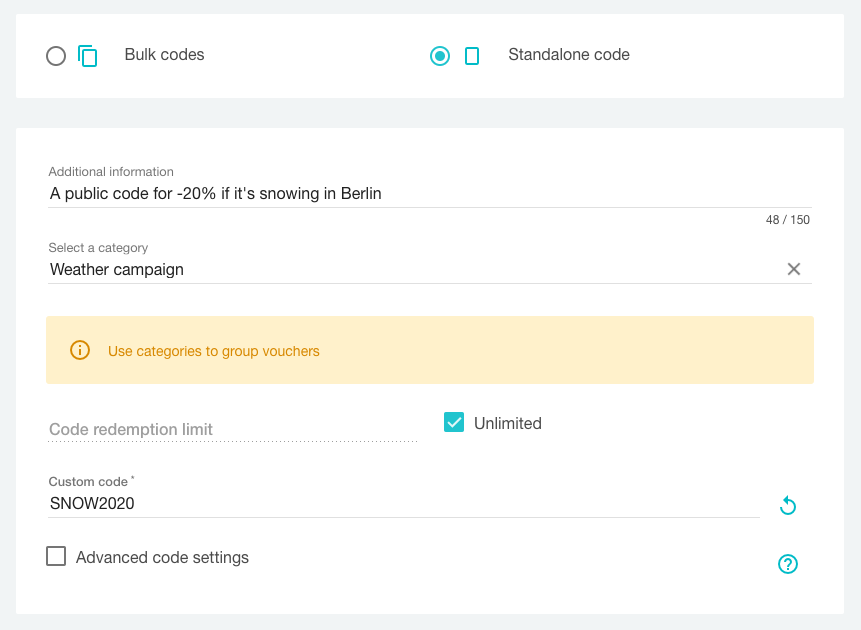
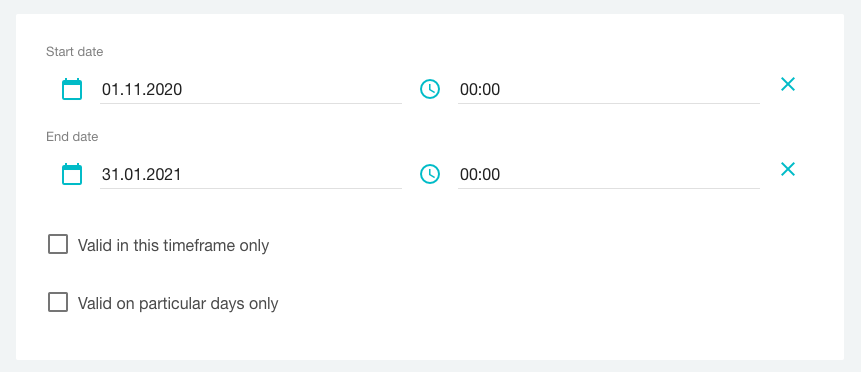
Then, set the campaign timeframe – we are running a winter-theme promotion so let’s set it to November 1st and January 31st.
Next, choose the discount type, 20% off, and add redemption limits (validation rules).
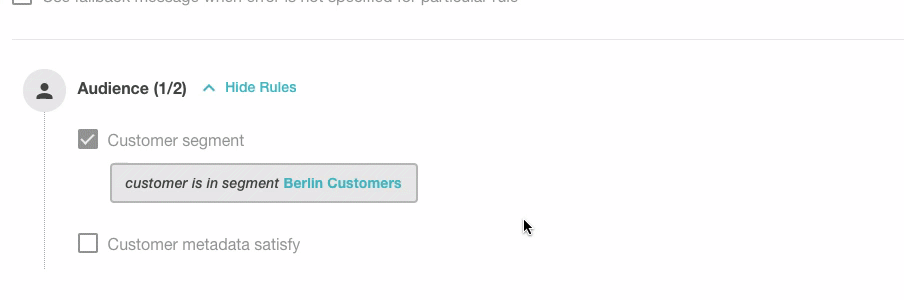
- Audience – The code is available only to customers from the Berlin segment.
- Order volume – The code is only valid for orders above 10 EUR.
- Budget constraints – The code is redeemable once per customer.
Skip the metadata and save the campaign after reviewing it in the final step.
After creating the code, come back to the Campaign Manager and create one more campaign – all parameters are going to be the same, except for:
- The code pattern is now COLD2020.
- The discount is 50% off.
- The code is available only to customers from the Berlin segment (Audience).
- The code is only valid for orders that include Hot Coffee (Order structure).
- The code is redeemable once per customer (Budget constraints).
Make sure to deactivate both codes – they are going to be activated (valid) only if specific weather conditions are met.

Share codes with customers
The last step is to share the code with customers. You can share the code on your social media, paid ads, or banners in your store. This time we would like to send the information about our codes via a text message. To do so, we will use the Twilio integration.
Note: You will need a Twilio account to test this workflow. The trial version of Twilio will suffice.
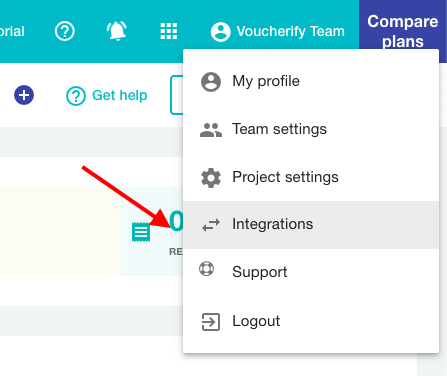
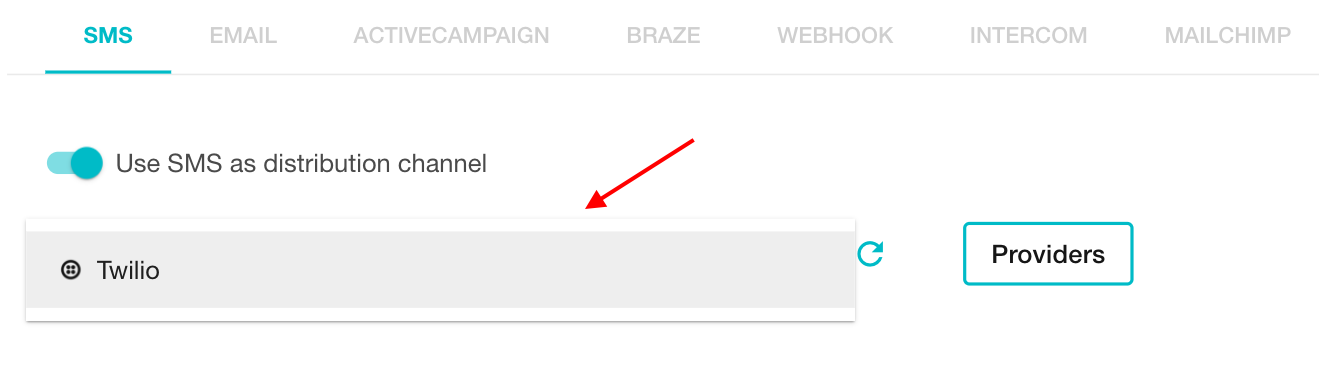
To connect your Voucherify account with Twilio, go to the Integrations Directory in the Dashboard.
Find Twilio and hit Connect. You need to provide:
- Account SID.
- Auth token.
- Phone number.
You can find this data in the main view of your Twilio project.

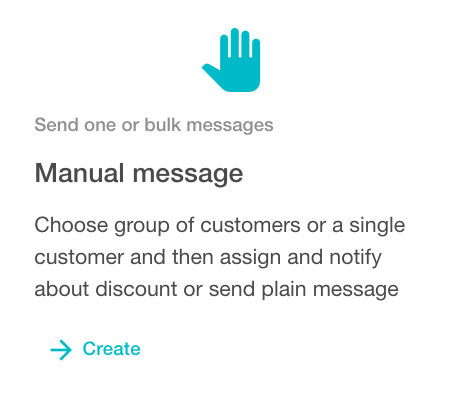
With the Twilio account connected, move on to deliver the code to Berlin customers. Voucherify can support the process of providing codes to your end-customers. Go to the Distributions tab and create a new message.
We are not going to base the distribution on any trigger – choose the manual message.
- Name the distribution (e.g., Winter Special).
- Choose the purpose of the message – Send a plain message to customers.
- Select audience – Bulk messages to customers from segment – Berlin Customers.
- Choose marketing consents or disable this feature.
- Select the channel – SMS – Twilio.
Finally, customize the text message and add variables (e.g., customers’ names). Variables act as placeholders that will be populated with relevant data after the messages are sent.
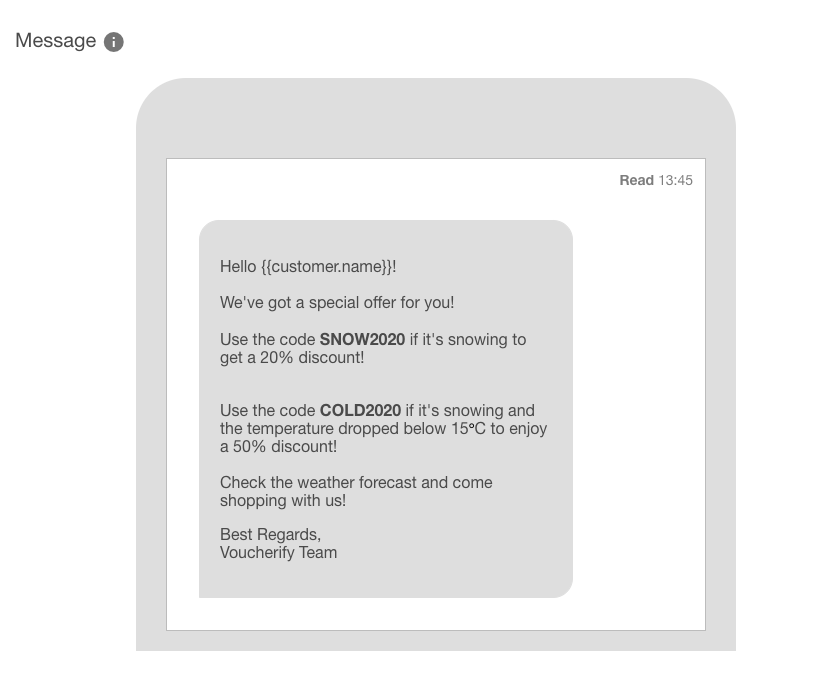
Don’t forget to include your public codes in the message and let your customers know about the promotion rules. Save and send the message.
Zapier – Glue of the Web
Zapier is one of the top automation tools for the modern tech stack. It supports more than 1000 web apps and allows you to connect them with little to no development work. We will use Zapier to connect the AerisWeather app with Voucherify. Log into your Zapier account and make a new Zap.
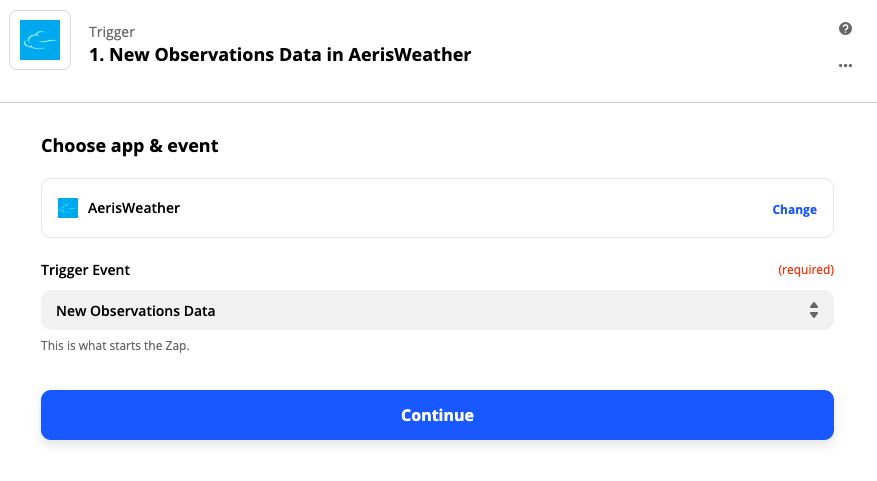
AerisWeather is going to act as a trigger. We are going to use New Observations Data as our event. Click Continue and authorize the connection by logging into your AerisWeather account (there is a free trial available).
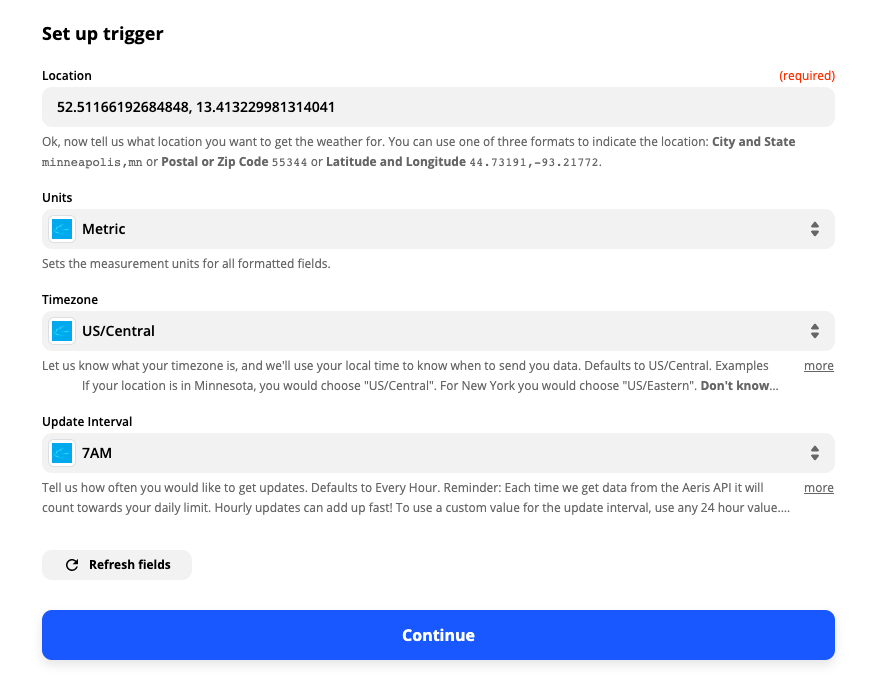
In the next step, you will need to set up the trigger. Provide a location (Berlin) where you would like to check the weather forecast. Select the measurement units (imperial/metric), timezone, how often the weather should be checked (in our case, every day at 7 am).
Next, Zapier will let you test the connection to see if your Zapier and AerisWeather accounts are correctly connected. In response, AerisWeather should display the current weather forecast for Berlin.
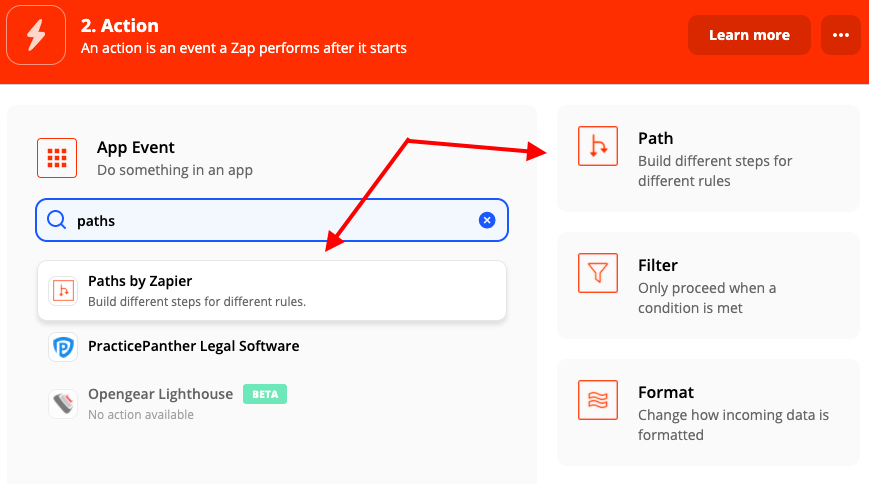
In the next step, define the actions that are going to follow a weather forecast in Berlin. We will build three paths:
- If the weather forecast includes snow, send a request to our server to enable the snow-special voucher SNOW2020 for -20% off.
- If the weather forecast includes snow and temperature is below -15°C, send a request to our server to enable the cold-special voucher COLD2020 for -50% off.
- If the weather forecast doesn’t include snow, disable both standalone codes to make the promotion disappear from your store/app.
To create paths, we will use the Paths by Zapier feature.
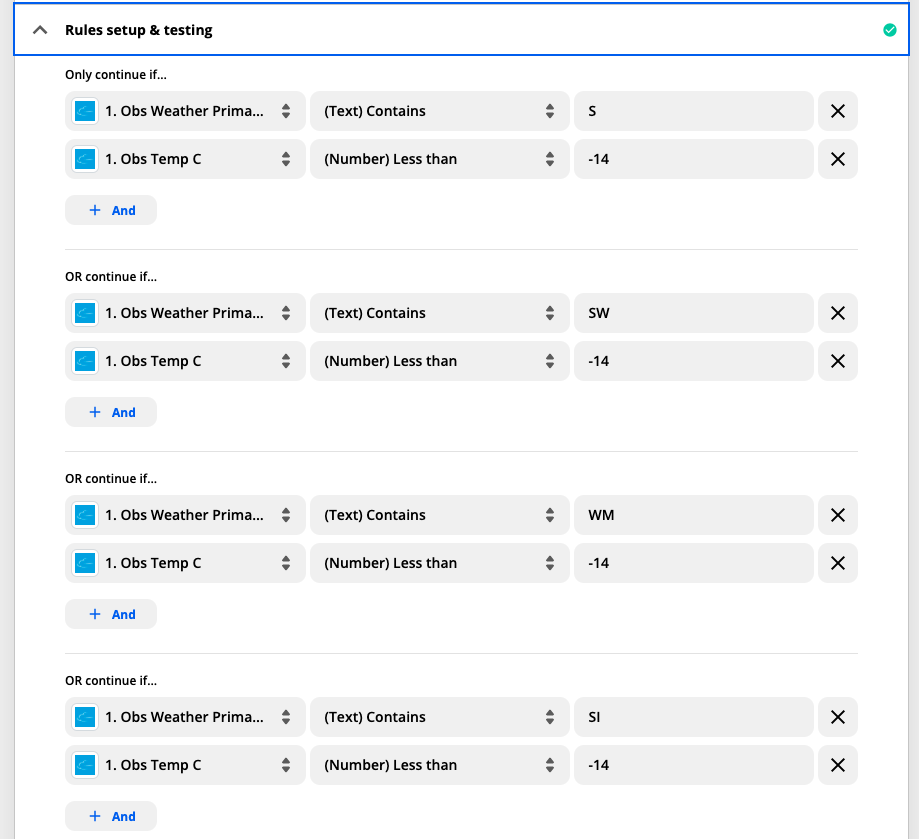
The first path – SNOW2020
Name your path and go to the Rules setup & testing section to modify the flow. Our flow will continue if the New Observation Data in AerisWeather for Berlin includes snow, which appears in the forecast under the shortcuts – S, SW, WM, SI, RS, BS. We need to add each one of the conditions separately, separated by OR condition:
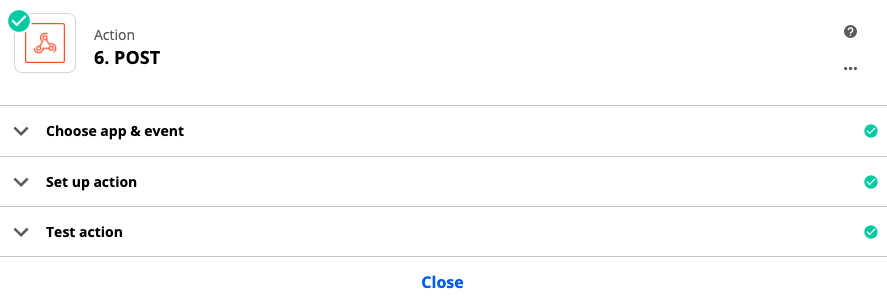
Click Continue to set up the follow-up action. We will use webhooks to notify our server about the current weather. Webhooks are a unique way of communication between different web apps. This time, we will send a POST request to Voucherify that will activate the previously created public code (SNOW2020).
You will need to add the API reference to enable the voucher and add the voucher name. You can find Voucherify API reference explained here. In our case, it is https://api.voucherify.io/v1/vouchers/SNOW2020/enable.
You will need to add your API ID and Token, which you can find in Voucherify Project Settings.
The second path – COLD2020
Exit the first path and build a second condition for snowy and freezing weather to enable the -50% standalone code. Again, name the path and create rules. Only continue if the New Observation Data includes snow (set up is the same as for the first path) and Observed Temperature is below -14°C. Again, we will need to set up separate rules for each weather code – six rules in total.
Continue to set up the actions – again, a POST webhook sent to Voucherify, this time it’s https://api.voucherify.io/v1/vouchers/COLD2020/enable.
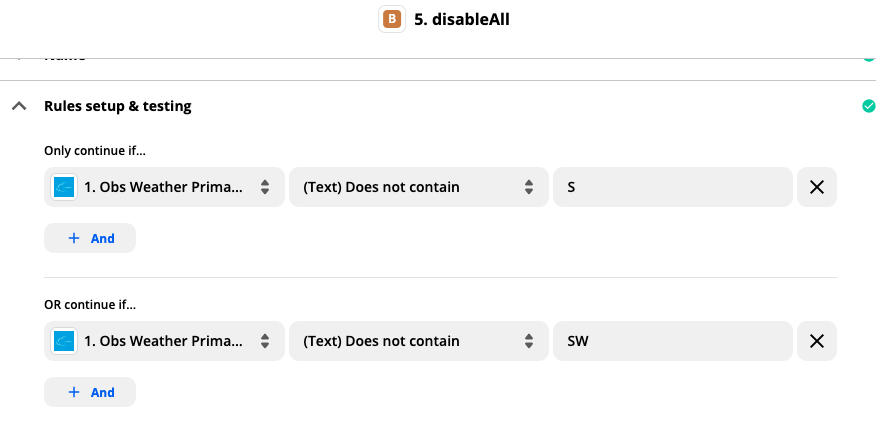
The third path – disable both codes
We want our standalone codes to be dynamic – they are enabled/disabled every day at 7 am based on the weather forecast for Berlin. We already know how to enable both. Now, let’s see how to disable the codes if there is no snow forecast.
Add the third path and name it. If the New Observation Data doesn’t include any of the snow-related conditions (again, each one separately), then send a POST request to https://api.voucherify.io/v1/vouchers/SNOW2020/disable and send a POST request to https://api.voucherify.io/v1/vouchers/COLD2020/disable. This will require two steps to be set up in Zapier.
Ensure that the Zap is on and it’s ready!

The two standalone codes, SNOW2020 and COLD2020, will be dynamically activated and deactivated based on the Berlin weather forecast. Keep in mind that while Voucherify handles the backend logic for your codes, you get full control over how to present the codes to end-users.
Let is snow – Global weather campaign
This flow is great for global companies that have users spread out in different locations. They can target users based on their local weather conditions.
In this example, we propose an outreach campaign for new customers, where we offer coupons for a free thermos or 40$ gift cards.
Here is the promotion logic:
- If it is snowing, the users will get a coupon for a free thermos, redeemable if their order is above 50$.
- If it is snowing and the temperature is below -15°C, the users will get a 40$ gift card valid for orders above 100$.
Campaign rules:
- Redeemable once per customer.
- Coupon validity seven days after publication.
- Gift card validity for the campaign’s duration (in our case, from 01/09/2020 to 31/12/2020).
The coupons will be distributed via Braze email automation.
The user journey in this campaign would look like this:
An ad leads to the landing page with a form to fill out. In the form, a visitor has to enable location sharing and enter their email address to take part in the weather-based campaign. If the user, in their (browser-provided) location, at the moment of filling out the form, has the weather conditions that are specified in the campaign, they will get the coupon or gift card, respectively. The coupons or gift cards will arrive to the qualified users via Braze email. The coupons/gift cards will be validated against the campaign’s rules (by Voucherify), and only the customers whose orders satisfy the pre-set criteria will be able to redeem them.
We will use a couple of SaaS platforms: Voucherify, Zapier, AerisWeather, Segment, and Braze to build this campaign.
How will it work from a technical point of view?
The weather and dynamic location are not parameters supported by default in Voucherify. However, by using metadata, you can feed custom data to Voucherify. Consequently, your custom data (such as weather, occupation, preferences, etc.) taken from the CRM or other platforms can be used to build customer groups and redemption limits for your promo campaigns.
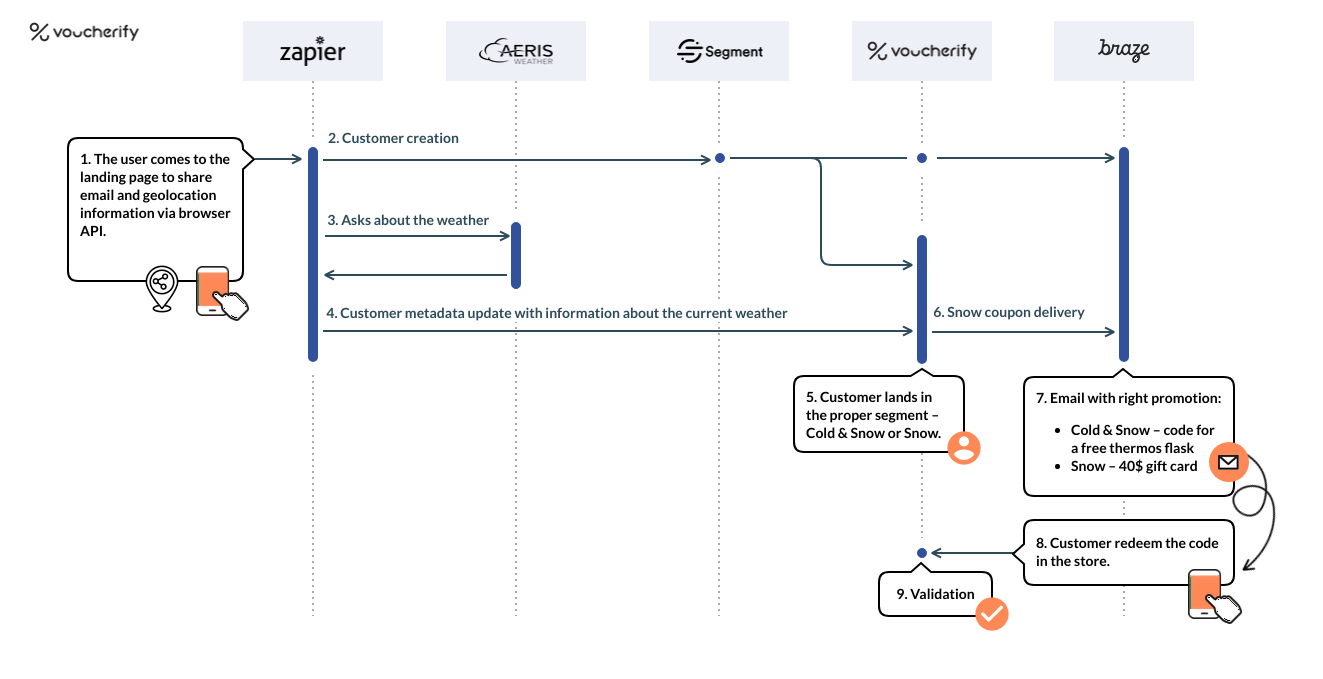
- The user comes to the landing page and fills out the form to share their email and geolocation information via browser API.
- The form sends the customer data via webhook to Zapier:
- Zapier sends the data to Segment.
- Segment sends the data to Braze and Voucherify.
3. Zapier asks AerisWeather about the local weather for the user, based on the geolocation information. There are two possible paths Zapier will follow:
If it is snowing and the temperature is below -15°C, then:
- Zapier requests Voucherify to update the customer with metadata: isCold: true, isSnow: true.
- The gift cards distribution of gift cards is automatic, triggered when the customer enters the relevant segment. The segment will gather customers who meet two metadata requirements isCold: true AND isSnow: true.
If at the user location it is snowing, and the temperature is above -15°C, then:
- Zapier requests Voucherify to update the customer with metadata: isCold: false, isSnow: true.
- The free thermos discount codes distribution is automatic, triggered when the customer enters the relevant segment. The segment will gather customers who meet two metadata requirements isCold: false AND isSnow: true.
Here is a summary of the steps you will need to take to set up this campaign:
- Create customer metadata in Voucherify.
- Build customer segments in Voucherify.
- Set up two campaigns – unique coupons and gift cards in Voucherify
- Prepare automated distribution with Braze using the Custom Attributes feature.
- Create a landing page with a form to collect customer information and a button to enable location sharing.
- Set up Segment integration to catch data coming from the form and transfer it to Braze and Voucherify.
- Go to Zapier and create a Zap with AerisWeather, Segment, and Voucherify plug-ins.
Create metadata in Voucherify
Before building campaigns, we should ensure that the data flowing from Zapier lands in Voucherify in the proper format. To ensure data integrity across platforms, you need to use the Metadata Schema Validator available in the Project Settings in your Voucherify account.
We are going to build several new metadata properties for the customer object. We need to define them beforehand to ensure that they are the same across the platforms used in this flow. We will need two metadata types: isCold and isSnow, with two possible values: true or false.
Choose “Standard” Metadata, then choose Customer on the right-side panel. Add two new definitions.
- isCold, type: flag.
- isSnow, type: flag.


Create customer segments
We will create customer segments based on the metadata we have just created. Thanks to these segments, we will be able to set up the campaign validation rules and a trigger for automated delivery. This way, if a customer meets specific weather criteria, they will receive the coupons automatically.
The segments will be:
- Cold and Snow: metadata satisfies: {isCold: true, isSnow: true}.
- Snow: {isCold: false, isSnow: true}.
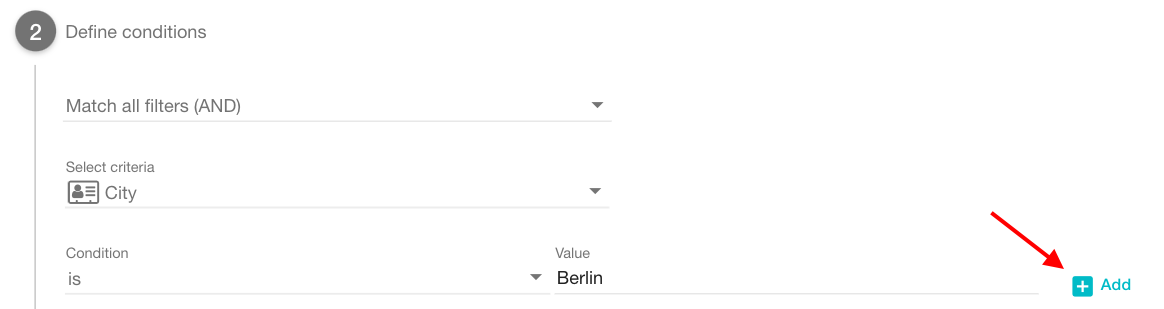
Find the Customers section on the left sidebar and build the first segment – Cold and Snow.
- Define the segment name: Cold and Snow.
- Select the auto-update type.
- Choose operator AND.
- Define conditions – metadata isCold is true and isSnow is true.
Move on to create the second segment where isCold: false, isSnow: true and save it.
With metadata properties added and segments created, you are ready to build two campaigns.
The Let it snow campaign uses two different campaign types. We will offer a discount code for a free thermos for customers who are currently experiencing snow and warmer temperatures (above -14°C) and 40$ gift cards for users facing snow and low temperatures (below -15°C).
Model the campaign – unique product discount
Open the Campaign Manager and create a discount coupon campaign.
In the first section, provide general information about the discount campaign.
- Choose bulk codes as your type.
- Enable the auto-update mode – if the number of customers eligible for the code exceeds the number of generated codes, new codes will be added automatically.
- Enable Customers can join the campaign once – even if the customer qualifies for the discount again, he/she will only receive one code from this campaign.
- Set the code redemption limit to once.
- Customize the code pattern, e.g., SNOW2020### (optional).
Next, select the timeframe of the campaign and the code validity. Make sure to set the code validity to 7 days after publication. The process of publication means the assignment of the code to the selected customer.

Then, choose the discount type. We want to give a thermos for free; therefore, we can set up a unit discount for the thermos flask. Choose Always add new order items as your discount effect. This way it doesn’t matter if the customer already has the flask in the cart – a new one will always be added to the order.
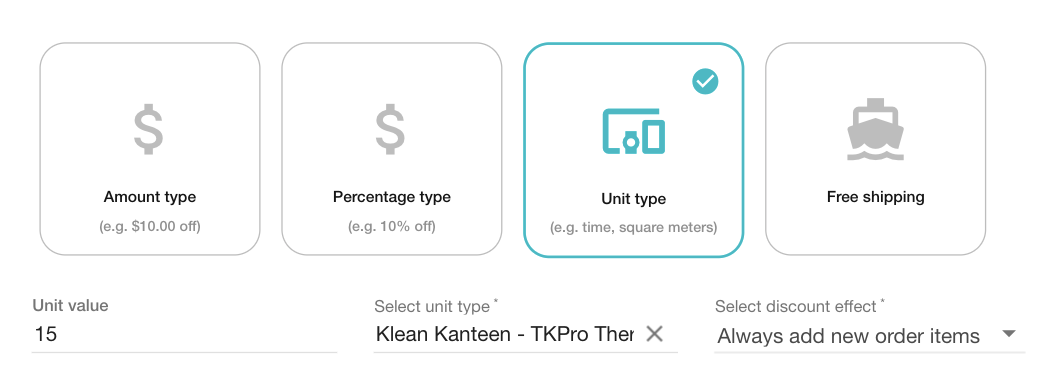
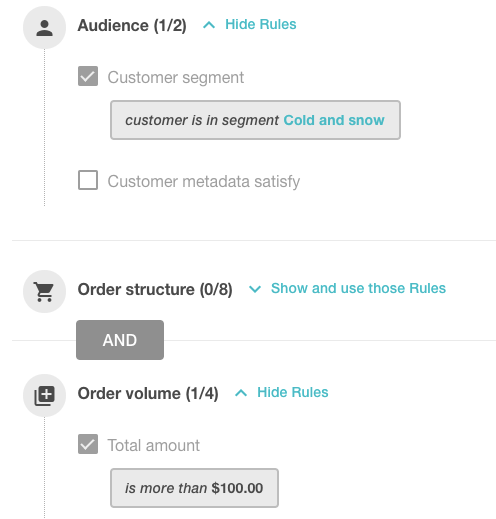
We will need to add the following validation rules:
- Audience: The customer is in the segment: Snow.
- Order volume: The order has to be for at least 50$.
After naming and saving your rules, skip the metadata, and review the flow in the summary step. If the flow is correct, save and make the campaign live.
Model the campaign – 40$ gift cards
Open the Campaign Manager and select gift vouchers as your campaign type.
Provide some necessary information:
- Choose bulk codes as your type.
- Enable the auto-update mode.
- Enable Customers can join the campaign once.
- Leave the code redemption limit to 1 (as the minimum order is 100$ in this campaign, they will be able to use the gift card just once).
- Customize the code pattern, e.g., COLD2020### (optional).
Choose the timeframe of the campaign. After the end of the campaign, December 31st, all gift cards will be invalid.
Next, decide about the value of the card and assign redemption rules to your codes. Load 40$ onto the cards and build the following rules:
- Audience – Customer is in the segment: Cold and Snow.
- Order volume – Total amount – is more than 100$.
Again skip the fourth section (metadata) and save the campaign.
Schedule messaging automation with Voucherify & Braze
The next thing to do in Voucherify is setting up the automatic delivery of codes to customers who meet the weather conditions. The Zapier automation, which you will see in the next step, handles the coupon publication. Coupon publication assigns a random code from a selected campaign to the new customer who meets the discount conditions. This process takes place behind the scenes – the actual email/text messages send-out will be handled by Braze.
Find the Distributions tab and build new automation.
We will have to do this step twice, once for the campaign Let it snow 1 (discount coupons) and once for the campaign Let it snow 2 (gift card campaign). The set-up is the same, so I will show it only once for Let it snow 1 campaign.
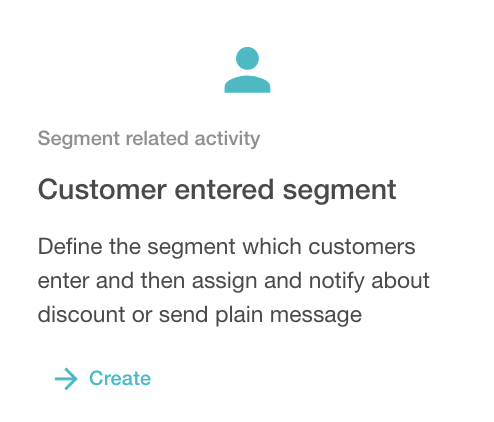
Choose the message trigger – Customer entered the segment.
- Name the distribution.
- Select the distribution purpose – Send and issue unique codes.
- Select the campaign.
- Select the audience – customers in the Snow segment.

Next, choose proper marketing consents or disable this function.
Finally, select the channel you want to use – Braze.

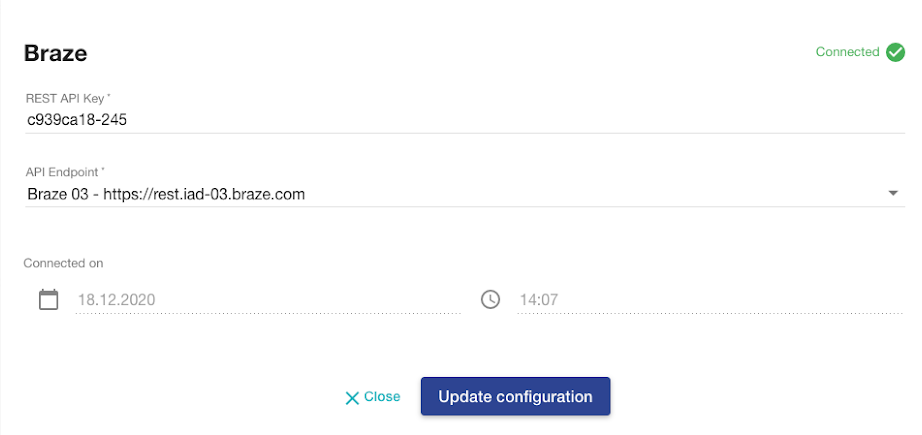
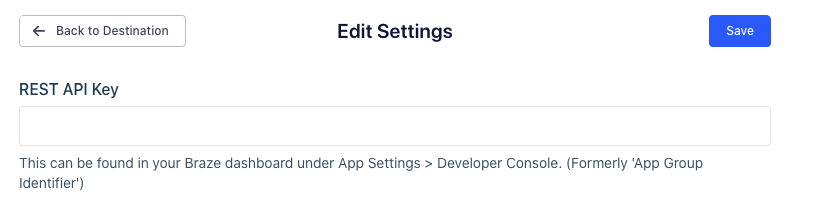
You will need to connect your Braze account in the Integrations Directory beforehand. For that, you will need your REST API Key and API endpoint information.
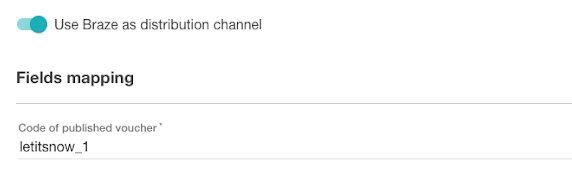
Then you can go back to the distribution and add a code of published voucher (we will use this name later in Braze to set up the distribution based on custom attributes).
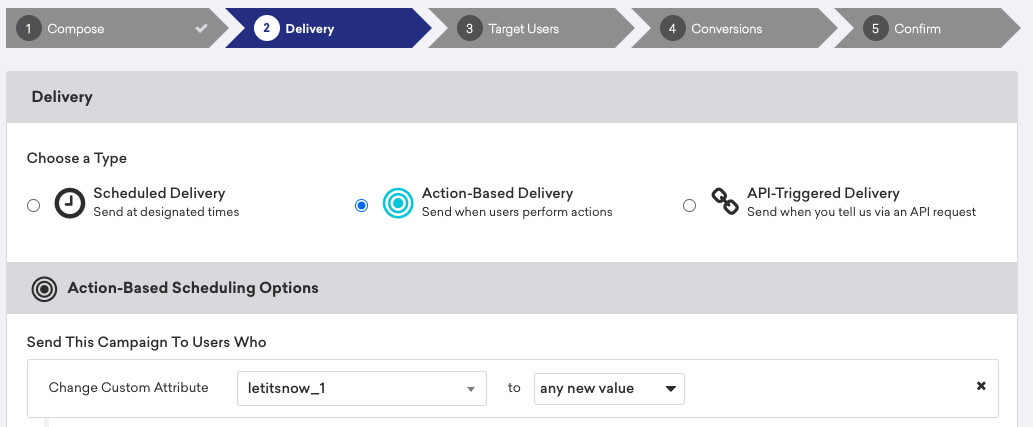
Let’s set up letitsnow_1 as the code.
Follow the same steps for the other campaign distribution (Let it snow 2). The only change in the set-up will be that the segment you will use is Snow and Cold and the campaign Let it snow 2. Also, the code of the published voucher will be letitsnow_2.
Set up the Braze email automation
The Voucherify & Braze distribution ensured that Voucherify would send unique codes to Braze to be added to customer profiles as custom attributes. We still need to set up the actual email templates in Braze for this integration to work.
We will use Custom Attributes to distribute the coupons only to the eligible customers. The custom attribute will be the code of published voucher we have added in the distribution in Voucherify in the previous step.
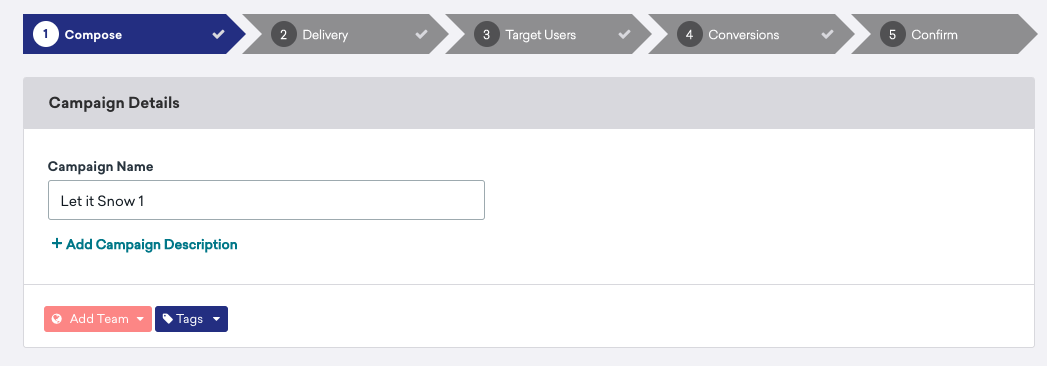
Create a new email campaign in Braze
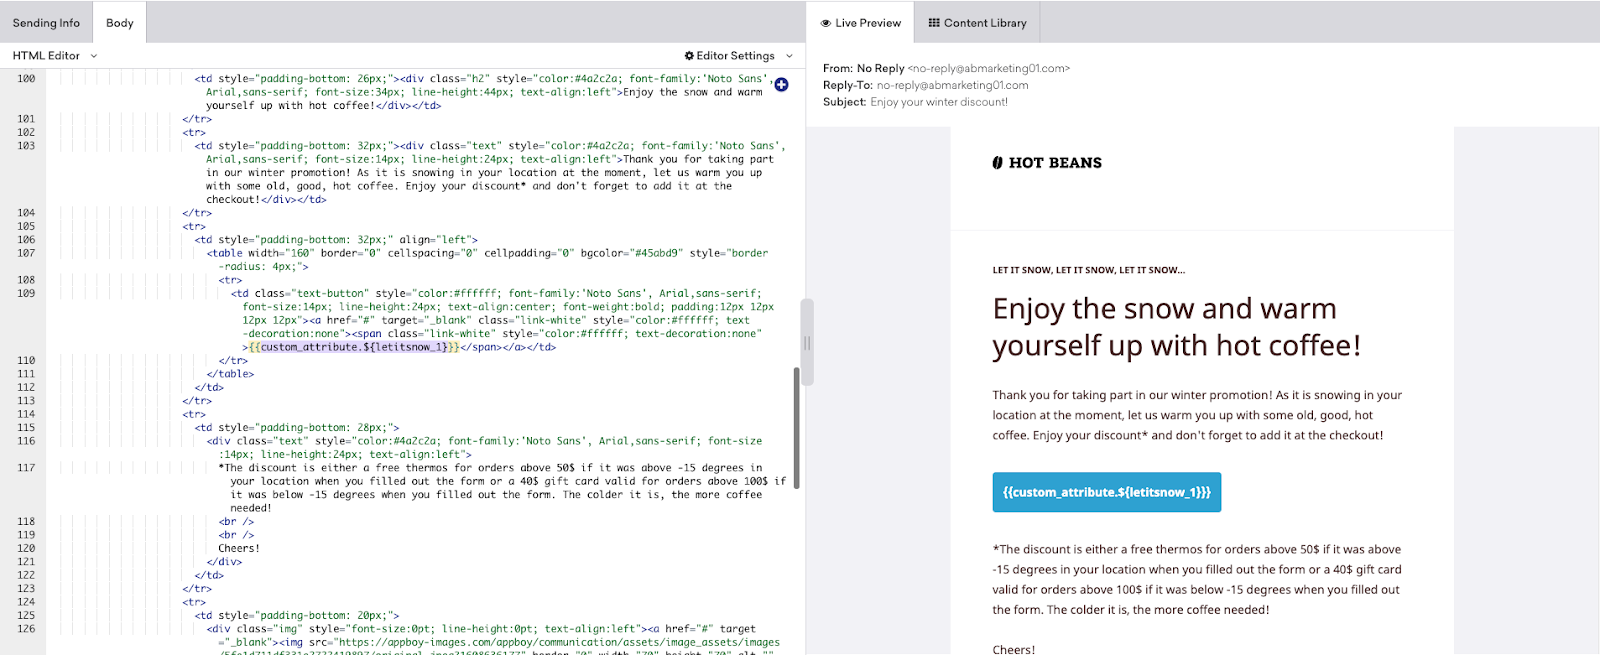
From the Braze Dashboard, create a new campaign, define your campaign name, choose an email template, and edit the email body. You will need to add the custom attribute to your email body to display the coupons.
Edit your email body and add the custom attribute defined in the Voucherify distribution. Type {{custom_attribute.${custom_attribute_with_code}}} to display the unique code. You can place it anywhere within the <body> tag of the email template. Make sure to make it stand out.
In our case, it is {{custom_attribute.${letitsnow_1}}} as we have set it up previously in Voucherify.

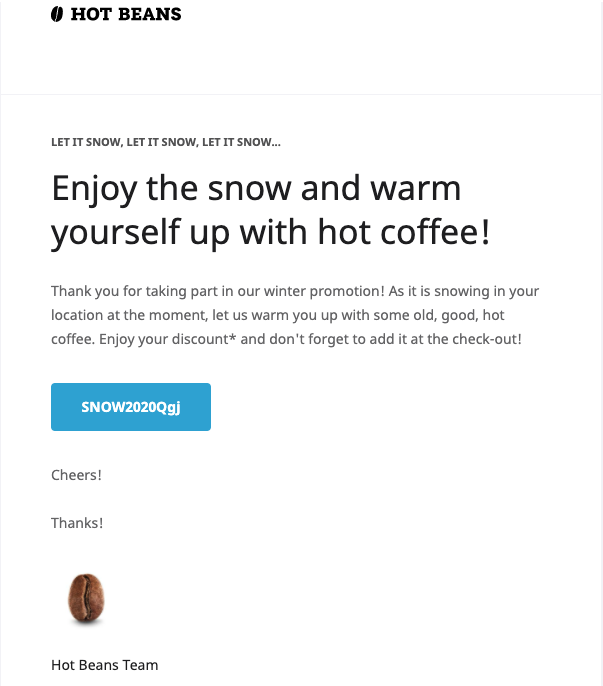
Here is how the email with the voucher code can look like:
Choose an action-based delivery method. The emails should be delivered if the custom attribute changes to a new value.
Then, you can continue setting up the other parameters of your Braze campaign.
Create a landing page
Now that our campaigns are live, we need to create a landing page to collect the emails to Braze and a button to enable location sharing. This is an exemplary widget that you could use on your website. This form collects email and geolocation (based on the browser-provided IP address) from the users and sends it to Zapier to start the Zapier workflow (that we will explain in the next step).
Set up the Segment integration
Segment is a customer data infrastructure (CDI) powered by a robust API. With the help of Segment, customers can easily collect, analyze, and transfer customer data.
You will need to set up Segment to send the email addresses from Zapier and create Braze and Voucherify users if someone fills out the form.
First, you need to create a Segment account. You will then have to add one Source (Zapier), and two Destinations (Braze and Voucherify) in Segment. You need to have accounts on these platforms beforehand, to copy your API keys. Zapier does not offer integration with Segment, so we will add it as an HTTP API request.
Go to Segment, choose Sources on the left side panel, and click on Add Source. You will be directed to a source catalog.
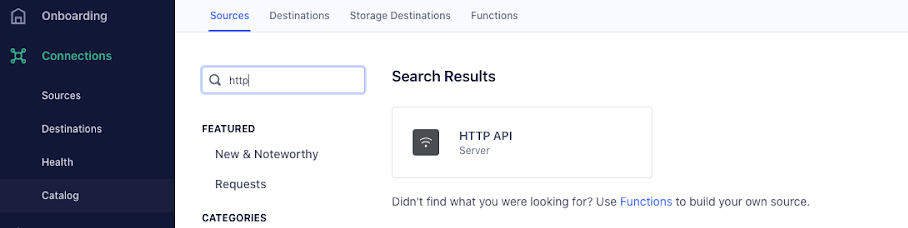
Add source and name it, for example, Zapier.
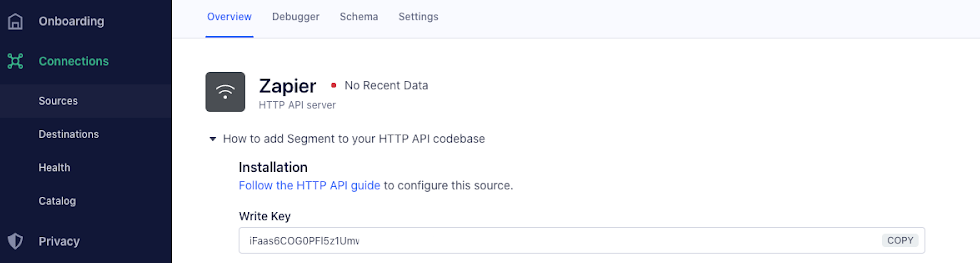
If you add an HTTP API and name it, you get a key you have to copy-paste to your Zap. We will explain how to do it in the next step. Until you set up your Zap, leave the source as it is, and move on to adding your destinations.
Click on a blue button Add destination or go to Destinations on the left sidebar.
Let’s add Braze as a Destination. If you click on add destination, the destinations catalog will open. Choose Braze and add it as a destination, then configure it. Select Zapier as your source.
Braze settings will open. You will need REST API Key and Appboy Datacenter (your Braze cluster).
You can find your API Key in the App Settings – Developer Console in Braze. You can even create a new, separate API Key there, choosing only user data to be sent out. On the right, you will find a button Create New API Key. After creating a new key or using the existing one, you can add it to Segment.

Then you need to add your Braze Datacenter cluster. To decide which is your Braze Datacenter, you need to check the structure of your REST endpoint, and if you compare it with Braze API definitions, you will know which cluster is yours.
After choosing your datacenter, enable the destination endpoint (blue slider next to the destination name).

Now, let’s add Voucherify as Destination. Follow the same steps as adding Braze – find it in the catalog, add, and configure the source to Zapier. Then all you need to do is to copy your API Key and Token.

You can find your API keys in the Voucherify Project Settings. Copy them and add them to Segment. Enable Voucherify (blue slider next to the destination name). You are all set up!
Set up your Zap
Go to Zapier and create a Zap with AerisWeather, Segment, and a Voucherify plug-in.
A quick reminder of the desired workflow:
1. The form sends the data via webhook to Zapier if the customer fills out the form on the website, with their email address and consent to track geolocation.
2. Zapier sends the data to Segment, which sends it to Braze and Voucherify, where users are created.
3. Zapier asks AerisWeather about the user’s local weather, based on his collected geolocation information. There are two possible paths Zapier will follow:
If at the user location it is snowing, and the temperature is below -15°C, then:
- Zapier requests Voucherify to update customers with metadata isCold: true, isSnow: true.
- The gift cards distribution is automatic, triggered when the customer enters the relevant segment for users who meet these two metadata requirements isCold: true AND isSnow: true.
If at the user location it is snowing, and the temperature is above -15°C, then:
- Zapier requests Voucherify to update customers with metadata isCold: false, isSnow: true.
- The coupon distribution is automatic, triggered when the customer enters the relevant segment for users who meet these two metadata requirements isCold: false AND isSnow: true.
Here is the Zap set-up:
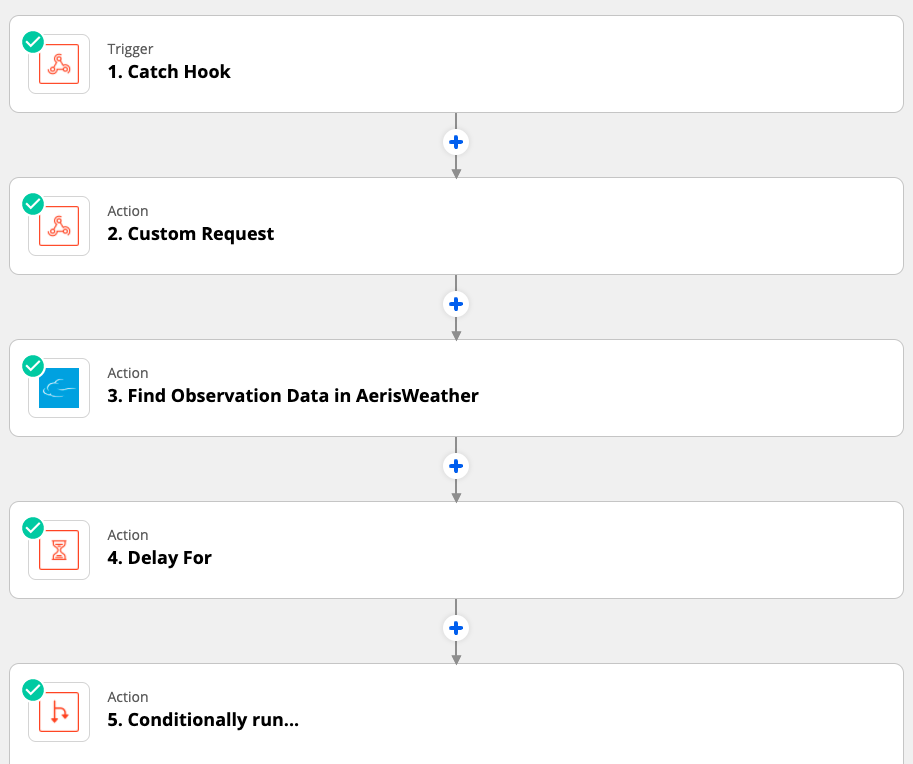
To reproduce this Zap, add the following steps to your Zap.
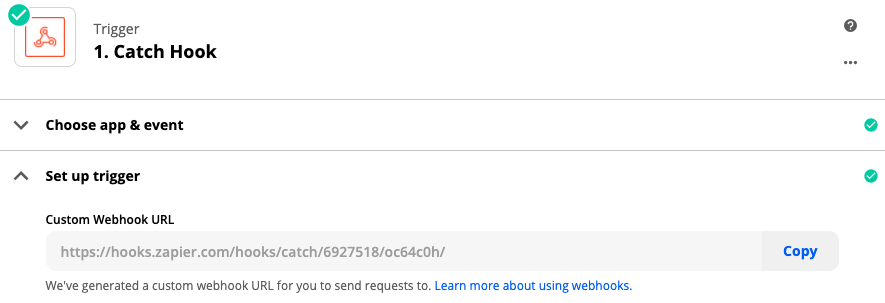
Webhooks by Zapier – Catch Hook
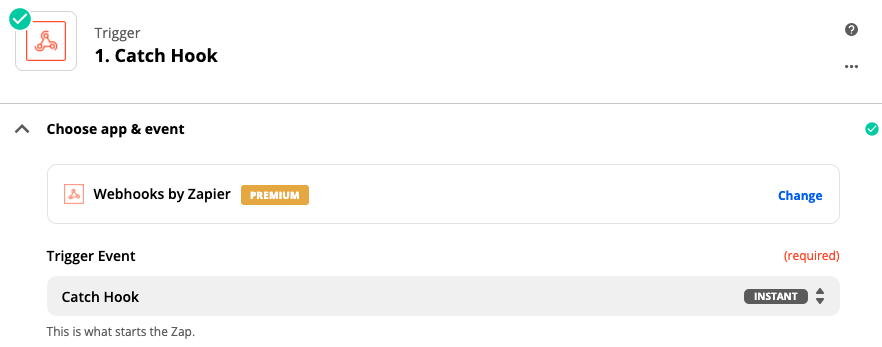
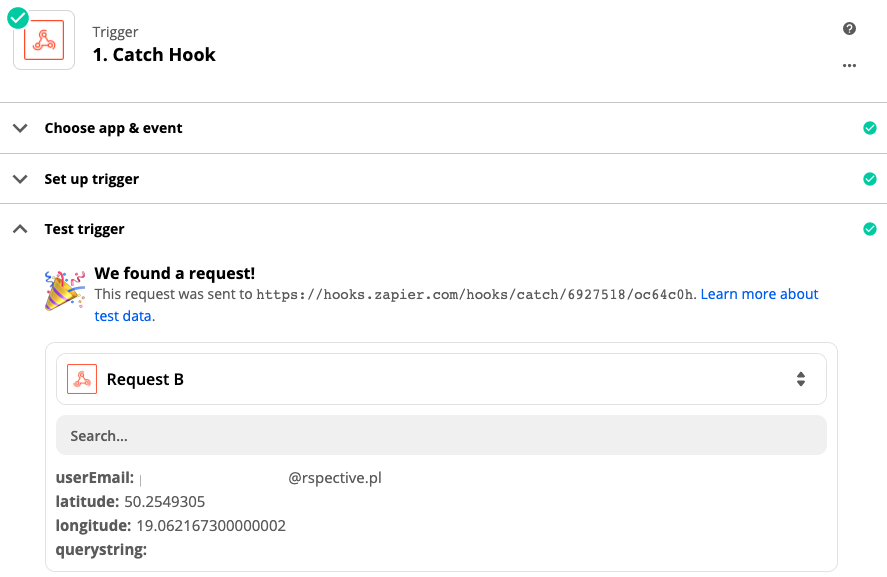
The first step on Zapier is catching a webhook sent from your website. This will trigger the entire workflow. The Zap workflow will be activated if someone fills out a form on your website. The form will send data to Zapier containing the user e-mail and geolocation.
If you set-up the “webhook by Zapier” on Zapier, a custom URL will be generated for you to send the requests. You will need to use this URL to set-up the webhook on your landing page.
We have created a sample code for the form, including webhook, here: https://glitch.com/edit/#!/thoracic-silky-angora
Remember to use your Webhook URL in line 57.
Here is an example of a response Zapier will catch.
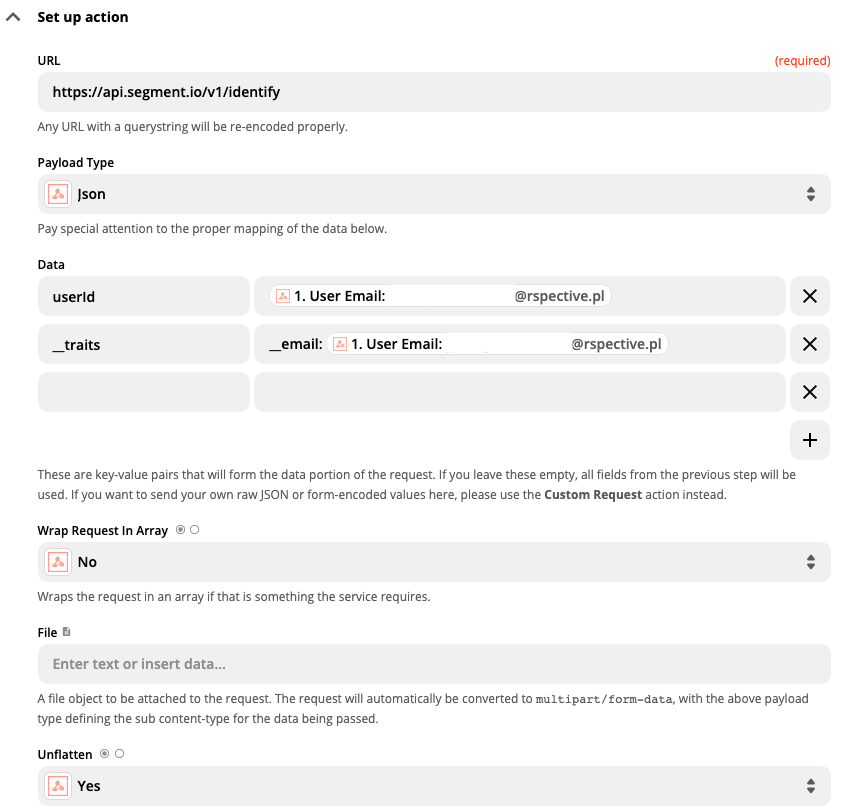
The second step on Zapier should be a webhook sent from Zapier to another application, in our case, Segment. You need to set up the webhook directly on Zapier.
You need to add the URL of the application, where Zapier should send the webhook. In our case, it’s Segment API: https://api.segment.io/v1/identify.

You need to mark in which format or language you will be sending your data – we have chosen JSON payload type because this is the format Braze reads the data in.
You need to mark which data should be sent out and map the data. We will be sending only the email addresses, but in Segment, we also need userId to identify the users, so we have decided to use the email as a user id. We have mapped it the following way:
{{CODE}}
{
"userId": "{{107784173__userEmail}}",
"traits": {
"email": "{{107784173__userEmail}}"
}
}
{{ENDCODE}}
Then, choose the following settings:
- Wrap requests in array: No
- Unflatten: Yes
Add Basic Authentication — this is your write key from Segment set-up (we got it when we were setting up Zapier as a source in Segment in the previous step).
Note that you need to add a “pipe” | after the write key to separate the key from the password. In our case, there is no password, so we just add the pipe and leave the space on the right empty.

After setting the webhook up, you can test it and check if the data collected in your form is successfully sent via webhook on your page to Zapier then to Segment, then to finally hit Voucherify and Braze.
Find Observation Data in AerisWeather
We want AerisWeather to check the weather forecast at the user’s location and to have the metadata assigned to the customers if the weather forecast shows snow or temperatures below -15°C. This metadata will be added to the customer data in Voucherify and will let us validate if the users are eligible for the promotion or not.
To set it up, you need to choose Find observation data in AerisWeather.
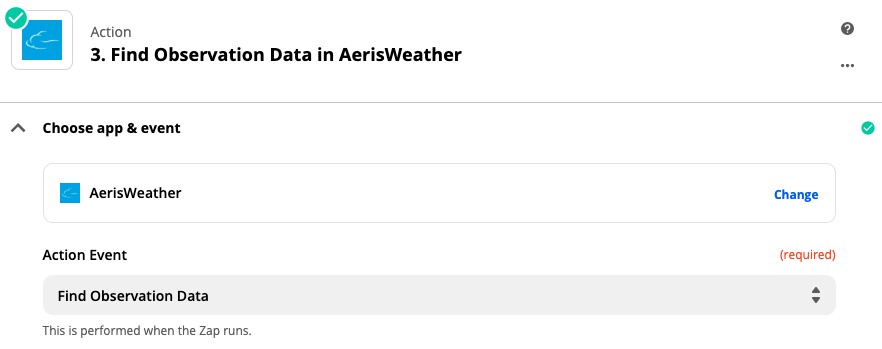
You will need to set-up an account on AerisWeather and add your AerisWeather user ID in Zapier.
As for the action – add location data that you have collected via webhook from your store and choose the units (in our case, metric).
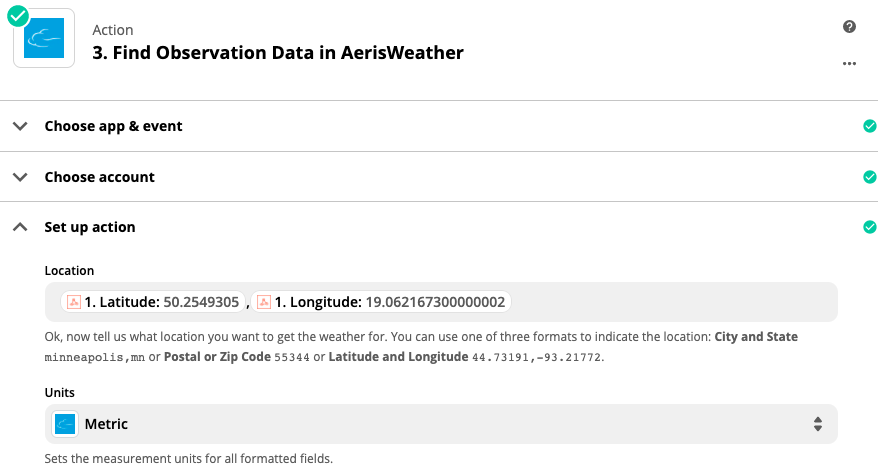
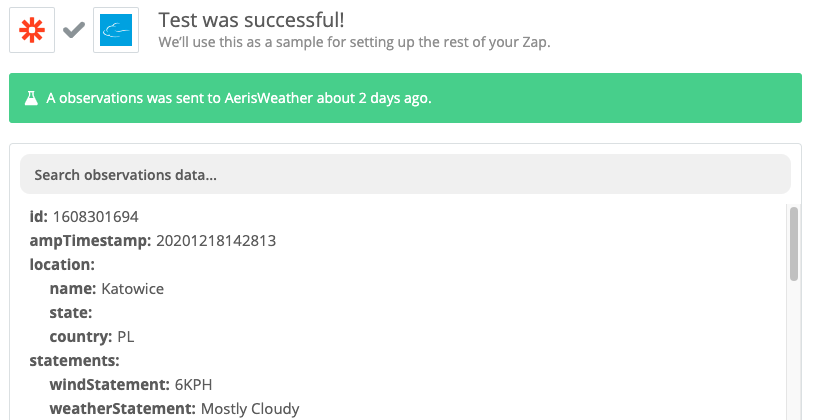
As you can see, the test was successful, and the response from AerisWeather returns the weather conditions in the user’s location.
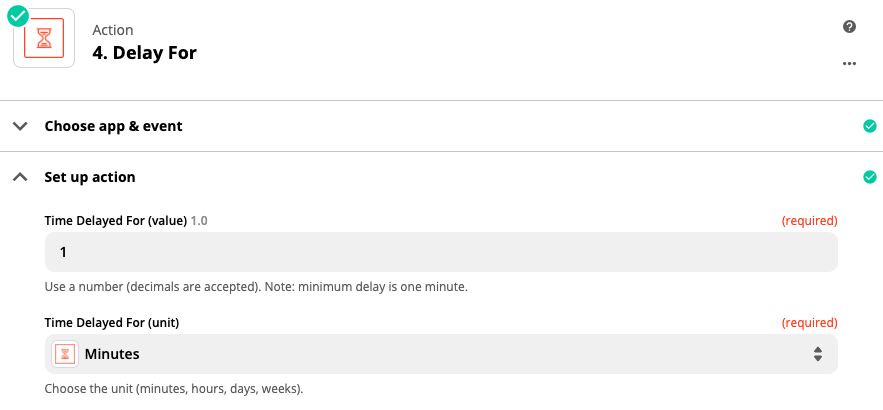
Delay for (by Zapier)
To give the applications some time between creating customers and updating their metadata, we need to add a step “delay for”. This will ensure the customer exists in Voucherify and Braze before we add metadata to their profile.
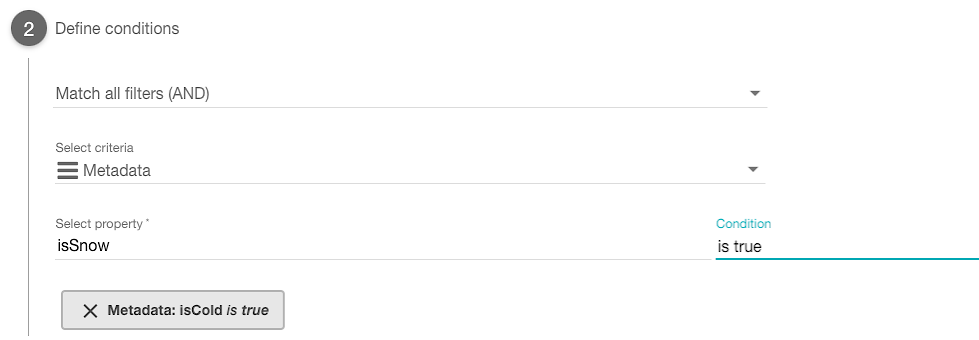
Conditionally run (by Zapier)
Now, you will need to set up a set of conditions. Suppose the weather forecast contains specific data (snow or the temperature drops below -15°C). In that case, predefined metadata should be added to the user data stored in Voucherify.
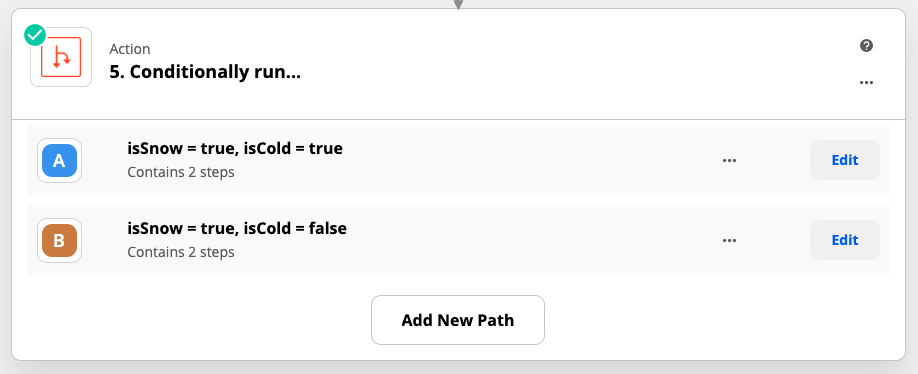
You will need to use webhooks by Zapier, choose action Conditionally run.
Create rules
We will need two scenarios, two sets of conditions (called “paths” in Zapier) based on which we will run two different campaigns.
Path A — it is snowing, and the temperature is below -15°C.
We need to set-up a rule set. We will name the metadata isSnow and isCold, the conditions will be marked as a flag (just as we have set it up in customer metadata in Voucherify).
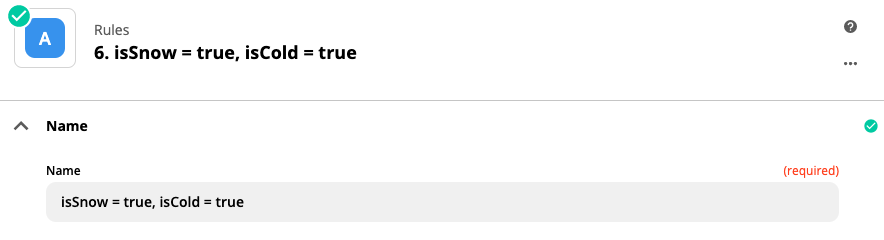
In this scenario, we want both values to be true, isSnow=true and isCold=true.
Let’s set-up the rules:
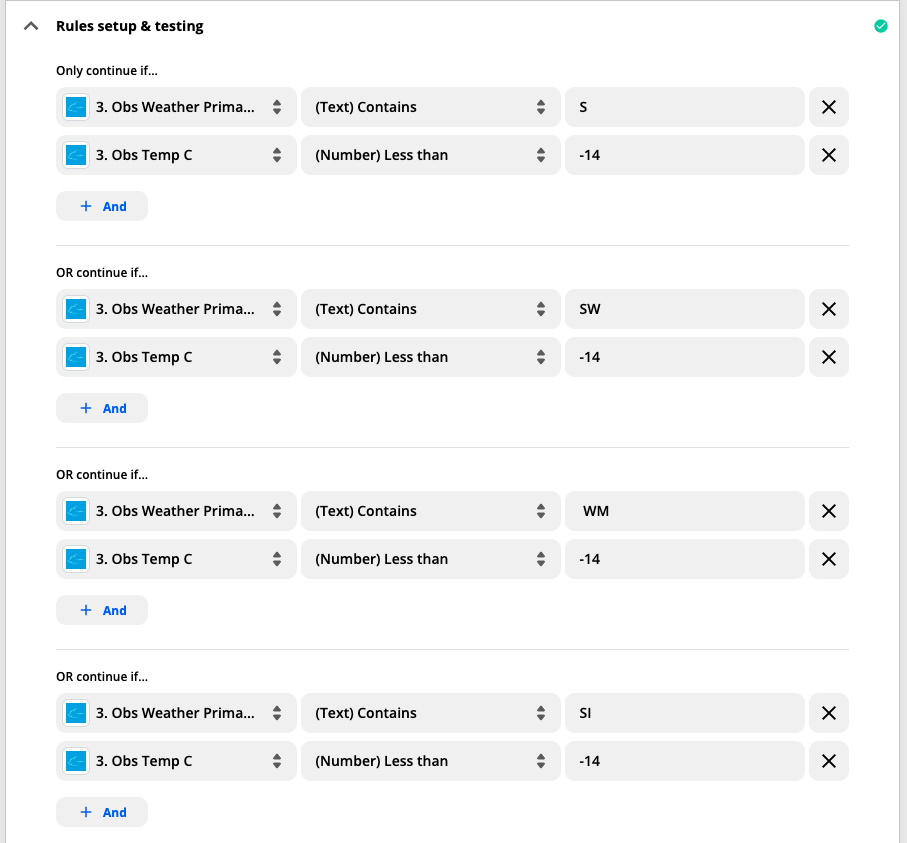

Note: these acronyms are primary weather codes, and we have chosen for this example all possible weather conditions that include snow.
Note: Obs Temp C is data showing the predicted temperature at the moment, in the given location.
You need to set up six rules in total as there are a couple of weather codes that predict snow (S, SW, WM, SI, RS, BS).
If these conditions are met, the Zap will continue to the next action. If these conditions are not met, the Zap will stop.
The next step is Action by Voucherify. This step will be performed if the rules we have just created are met. This step will be the same in both paths, A and B, but will differ by the metadata added to the customer. We will show this step for path A and later tell you what should be the set-up for path B.
Action by Voucherify – Update Customer in Voucherify
You will need to choose a plug-in from Voucherify – Update customer in Voucherify (1.9.0). Thanks to it, you will be able to add metadata to the user that has filled out the form on your website, based on the weather forecast conditions for their provided location. This metadata will describe whether they meet the requirements of the campaign (snow and temperature). You need to choose the app – Voucherify (and the current version of the app) and the action event (Update Customer).
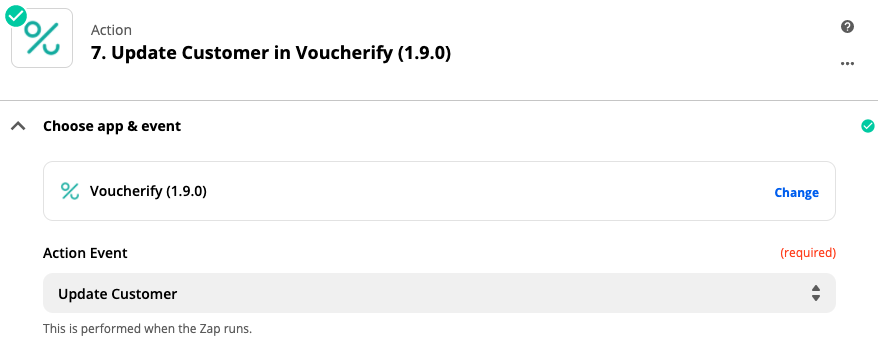
You need to choose a Voucherify account and connect it to Zapier. Then, you need to set up the action.
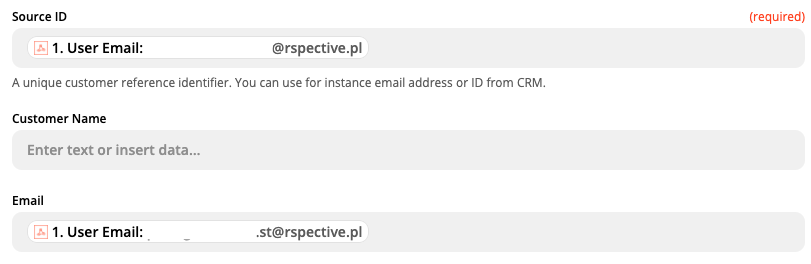
Here is what we will send:
- Source ID: user email
- Email: user email
- Metadata – isSnow true and isCold true

You can test your action now.
Path B — it is snowing, and the temperature is above -15°C.
The set-up of this path and action by Voucherify is almost identical as in path A. The only two differences are:
- You need to set up the condition to Obs Temp C is more than -15°C (instead of less than -14°C).
- Metadata added to the customers in Voucherify has to be isSnow=true, isCold=false.
Voila! You have finished setting up your campaign. Now you can promote it on various channels, for example, Google Ads, Facebook or Instagram ads, or even offline media (an advertisement in a printed magazine or a poster, directing the audience to a landing page link via a QR code).
Note: This campaign set-up is validating weather conditions when the customer fills out the form. You could also set up a different validation scheme, for example, checking the customer’s weather during the redemption of the voucher/gift card (everyone gets a coupon, but they can use it only during snow). Voucherify gives you plenty of possibilities thanks to a flexible and robust API.
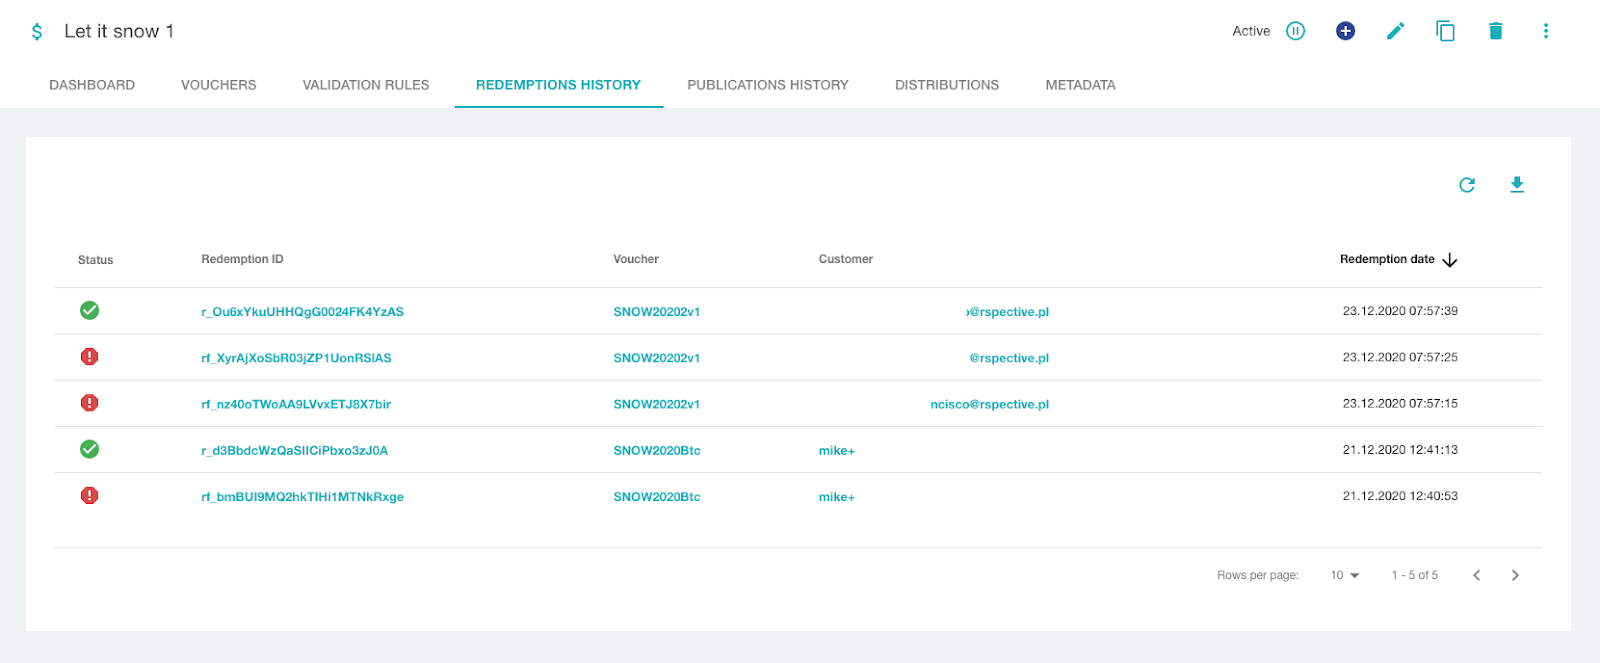
After setting up your campaign, you can track publications and redemptions directly in the Voucherify dashboard.
Note: for this campaign, distributions can be analyzed only in Braze, as we have not used Voucherify distributions. If we have used Voucherify as the distribution channel, we could see the distribution analytics in Voucherify.
Redemptions history
From the campaign view, you can see the status of redemptions (successful/failed), the redeemed vouchers, customers, and the redemption date.
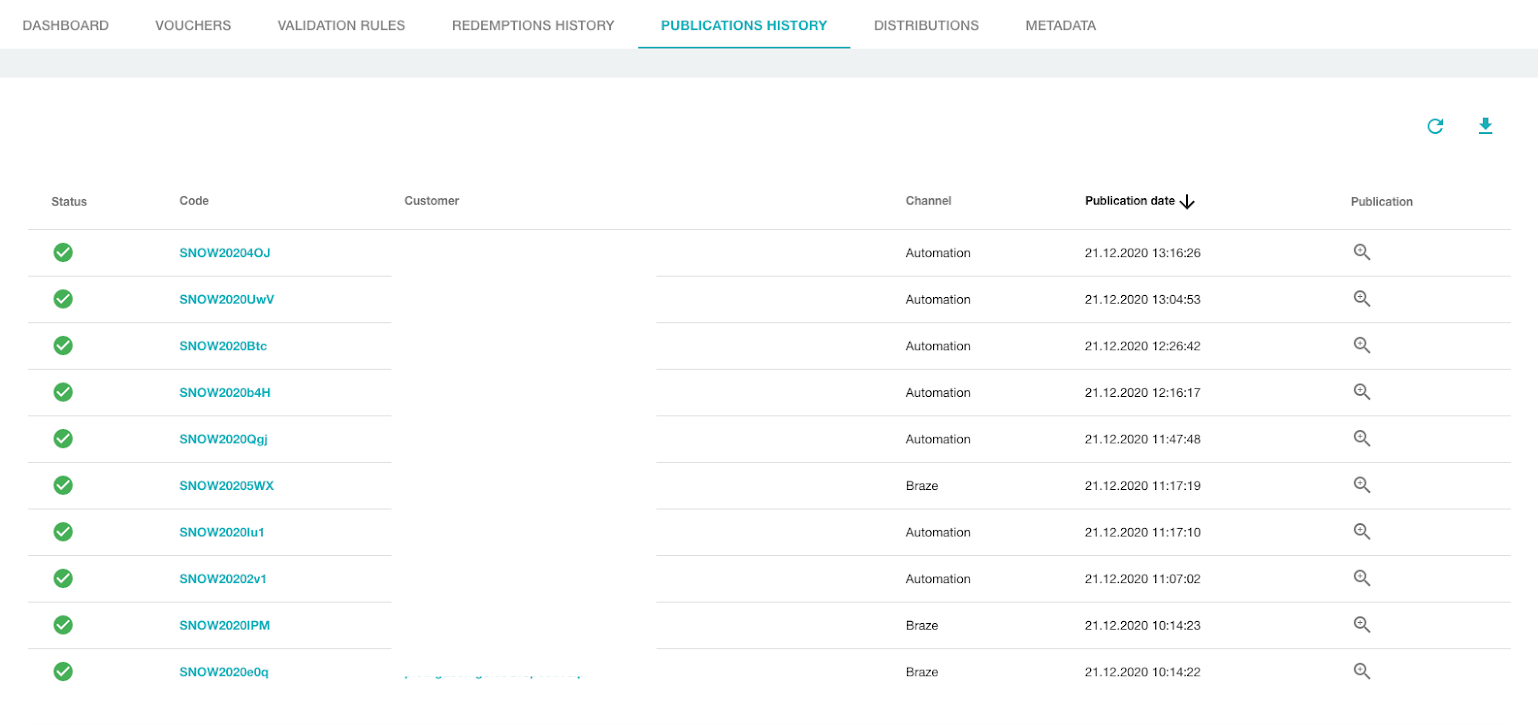
Publications history
From the campaign view, you can also see the publication history. It shows you how many vouchers were published, which was the voucher code, to whom they were published, when and via which channel.
Summary
Thanks to Voucherify’s flexible API and its broad integrations, you can create advanced promotional campaigns that require little to no coding from your side.
{{CTA}}
If you want to get to know more about Voucherify features
{{ENDCTA}}
FAQs
With its powerful API-first architecture, Voucherify can be quickly integrated into any existing systems and scaled effortlessly as the business grows. It's perfect for brands that want to take full control of their promotional strategies, without the limitations of cookie-cutter solutions and ready plug-ins.


.jpg)

.jpeg)