


How to Use Headless Commerce Platforms for Marketing Campaigns?
What are headless commerce platforms?
Headless e-commerce platforms or API-based platforms - software in which the front end (or the “head”) has been decoupled or completely removed, leaving only the backend.
The architectural concept that underpins these platforms started out with the CMS world. By separating layers, business wanted to fight roadblocks on their way to faster content delivery on newer and newer marketing channels - with the smartphone playing first fiddle.
With the traditional CMS software, the low-level issues developers have faced:
- the design is constrained by legacy frameworks, pre-defined set of experiences available only;
- small front-end change may require changes in database and back-end code, increasing testing time, and thus the total cost of the task;
- changes to back-end code can cause unexpected errors in front-end;
have accumulated and translated over time into handbrake for business:
- little or no room for personalization;
- confusion and mutual misunderstanding on why small software changes take ages to complete;
- new marketing channels untapped or by-passed low-priority software that comes too late.
As a result, “API-first”, “API-based”, or “headless CMS” have burst into bloom. But that soon expanded to other digital areas including e-commerce and marketing.
If this is the first time you’ve met headless platforms, you might find my last article interesting: Understanding API-Based Platforms. Also, Paul, in his Introduction to Headless eCommerce, shows some real-life examples of applications built with API-based tools.
Headless platforms – from an idea to a production-ready POC in 1 day
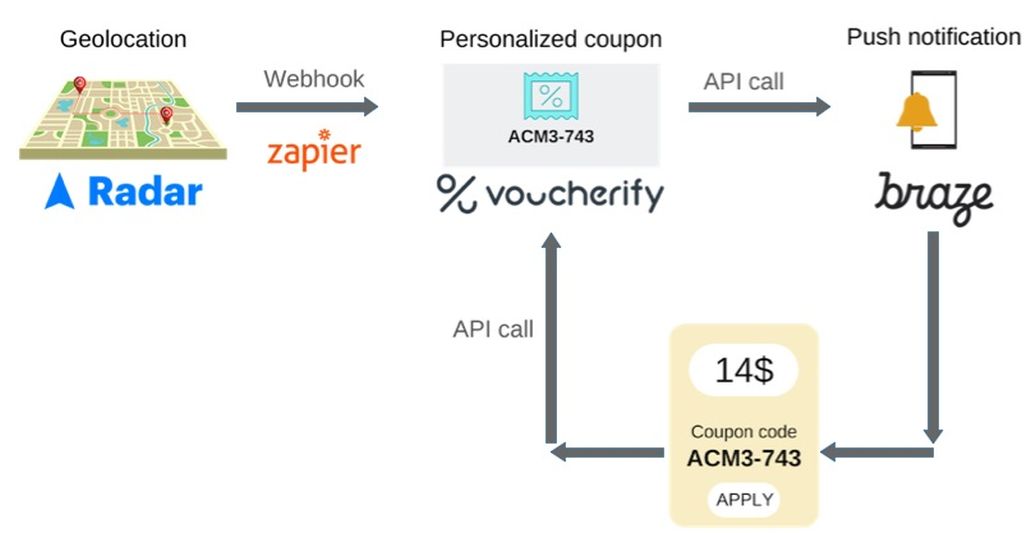
Let’s check if we can really build flexible software that fast. We’re going to recreate a marketing strategy used by top brands these days. In a nutshell it will:
- Geolocate customers.
- Assign a personalized discount coupon to them.
- Deliver a unique coupon code with a push notification.
It’s not hard to imagine that companies like Uber must have invested a dozen developer man-months or even more in this software.
What might look like the simplest task - assigning a random discount code - is burdened with caveats. I’ve learned this the hard way because our team has been working on it for 3 years now. The number of new corner cases growing over and the management overhead can burn even something that looks like a straightforward system.
Fortunately, the headless platforms are here to help us.
We’ll use three developer-friendly SaaS platforms to create a working solution:
- Radar - geolocation API
- Voucherify - promotion management API
- Braze - notification API
Let’s see how we can meld them together to awe your customers with truly personalized promotions delivered through headless approach.
Note: the following solution assumes you have an active account on Radar, Voucherify, and Braze. Also, all of them should be populated with your customer database, including a field that can be used to uniquely identify a person.
Detecting the moment a customer enters your place with Radar - headless geolocation
The concept behind Radar is straightforward. The platform geolocates apps using 3 context types:
- Geofence - Radar prides themselves on being more powerful than native iOS or Android geofencing, with cross-platform support for unlimited geofences, polygon geofences, and stop detection. This is because all geofencing and event generation happens server-side.
- Places - Radar can recognize an extensive list of places because it uses the Facebook database. And the coolest thing about it is that you can work with built-in categories (e.g., major airports) or chains (e.g. Starbucks).
- Insights - Their location engine can also learn how to approximate a user enters/leaves home and office.
When Radar detects your user visits or leaves the place, it lets you notify your application with a webhook.
All you need to do, as a developer, is to use one of the software development kits (iOS, Android, Web) to authenticate and configure and fine-tune tracking options - e.g., if you want to track in the background or foreground.
Let’s see Radar headless platform in action then!
1. Set up your account
Go to radar.io and sign up for an account, then use testing API keys to initialize the Radar widget as shown below:
{{CODE}}
<script src="https://js.radar.io/v1.0.0/radar.min.js" integrity="sha384-TFQktvQ2F2ST3MCcepqaOHqwc36jDy7r/gAj7dOvU6VXtJ4m4Dj2hByxZ59d4MjK" crossorigin="anonymous"></script>
<script type="text/javascript">
Radar.initialize("YOUR_KEY");
</script>{{ENDCODE}}
2.Track users
The final step is to verify if the tracking works. To do so, we’ll use the trackOnce method which is invoked if Radar detects any changes to location.
Let’s run the code and see what information Radar provides (remember to allow location tracking in your browser):
{{CODE}}
Radar.trackOnce(function(status, location, user, events) { console.log({ status, location, user, events });});
{{ENDCODE}}
Output:
{{CODE}}
events: [] (0)
location: Coordinates {latitude: 50.25462479999998, longitude: 19.061743829999994, altitude: null, accuracy: 165, altitudeAccuracy: null, …}
status: "SUCCESS"
user: {userAgent: "Mozilla/5.0 (Macintosh; Intel Mac OS X 10_14_4) Ap… (KHTML, like Gecko) Version/12.1 Safari/605.1.15", ip: "93.179.216.18", locationAccuracy: 165, deviceType: "Web", stopped: true, …}
{{ENDCODE}}
OK - Radar has found our hideaway. But without the context, it doesn’t know what to do with this information. Let’s work on Radar’s intel.
We’re going to give a name for the place you’ve checked in from - in general (in Radar too) this location context is called a geofence. Here’s how to do this:
- Go to the geofence creator.
- Select a respective source type, I’ll go for Place and type my company as a query.
- In result, Radar looks up the geo coordinates and suggests a geofence border.

- If the location works for you, confirm the geofence with CREATE.
Now, let’s refresh the page and watch the console. The radar now send us some events:
{{CODE}}
{
"createdAt":"2019-04-16T16:08:49.645Z",
"live":false,
"type":"user.entered_geofence",
"location":{
"coordinates":[
19.062212,
50.254927099999996
],
"type":"Point"
},
"locationAccuracy":20,
"confidence":3,
"actualCreatedAt":"2019-04-16T16:08:49.645Z",
"user":{
"_id":"5cb5f2ba36581b002a3534ca",
"userAgent":"Mozilla/5.0 (Macintosh; Intel Mac OS X 10_14_4) AppleWebKit/537.36 (KHTML, like Gecko) Chrome/73.0.3683.103 Safari/537.36",
"deviceId":"a96ec0db-969c-4a77-996c-361a0530660a"
},
"geofence":{
"_id":"5cb5f7d3a60e95002b009ebd",
"description":"rspective",
"type":"circle",
"geometryRadius":100,
"geometryCenter":{
"type":"Point",
"coordinates":[
19.062346299999945,
50.25495069999999
]
}
},
"_id":"5cb5fe117cd3430025b9ee0d"
}
{{ENDCODE}}
It seems like it understands that we’ve entered our newly created geofence. As we sit in the same place, subsequent refreshes shouldn’t bring any new events. But when we change the location, Radar will detect it as well.
To test it, grab your machine, go outside the geofence area, and log in again there🚶♀️Or... you can use Sensors from the Chrome Tools.
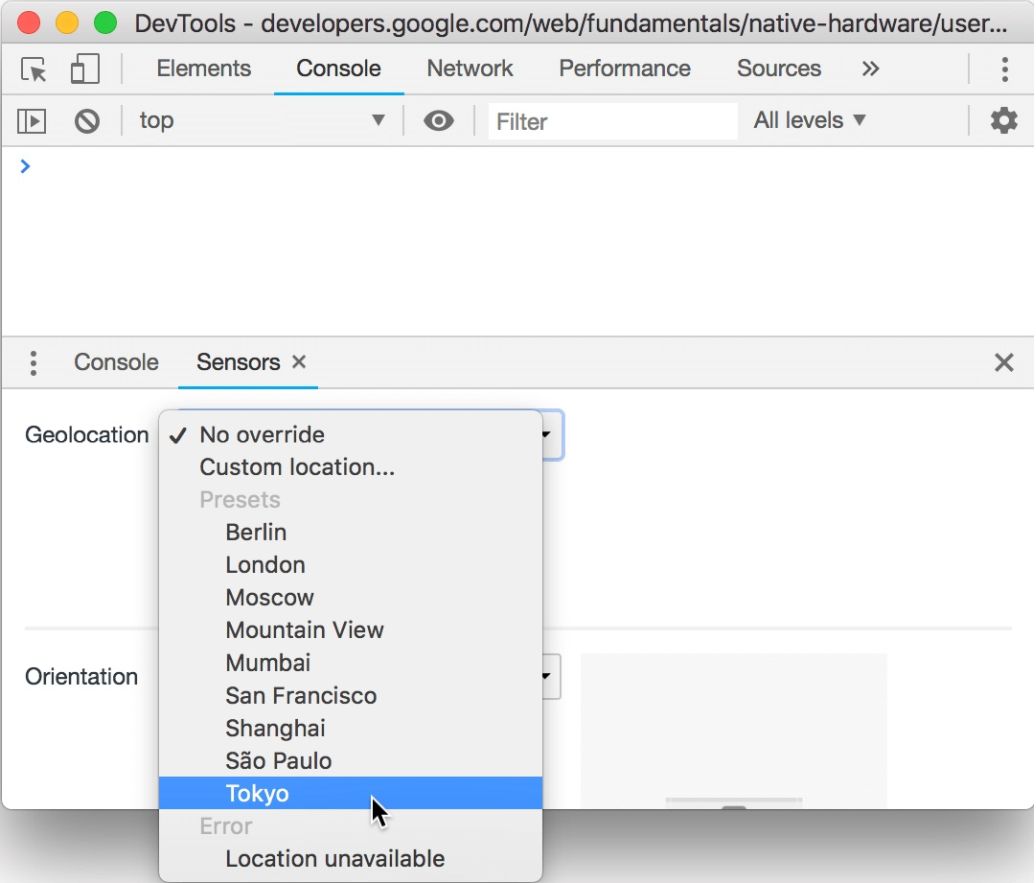
Fake your location by selecting any distant enough and refresh the page again. Now Radar shows that user.exited_geofence
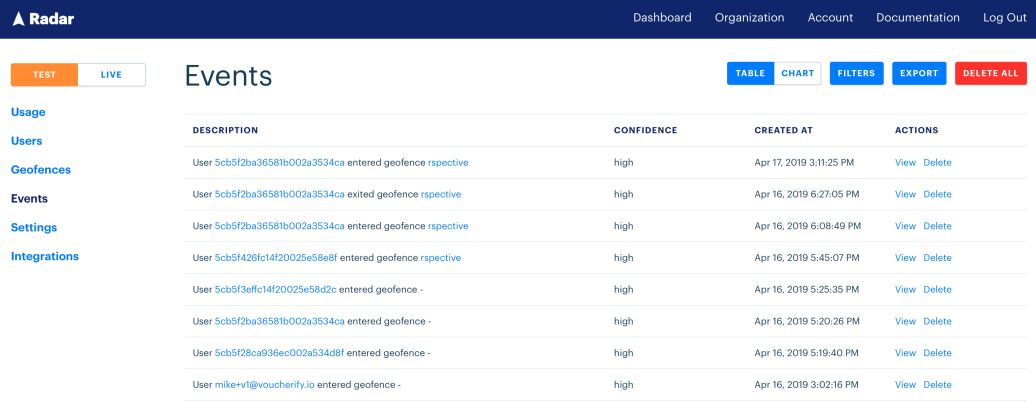
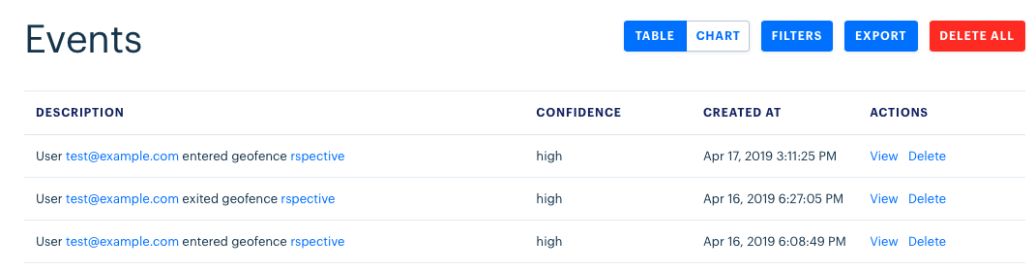
You can track geolocation events for all registered and unregistered users with the convenient Radar’s dashboard, in real time:
Notifying external apps through headless messaging
So Radar’s tracking understands now our location context. But to make use of it for our scenario, Radar has to share it with the outside world. And it does so in many ways. One of them is by using webhooks.
A webhook is an API concept that gives a way for an application to provide other applications with real-time information.
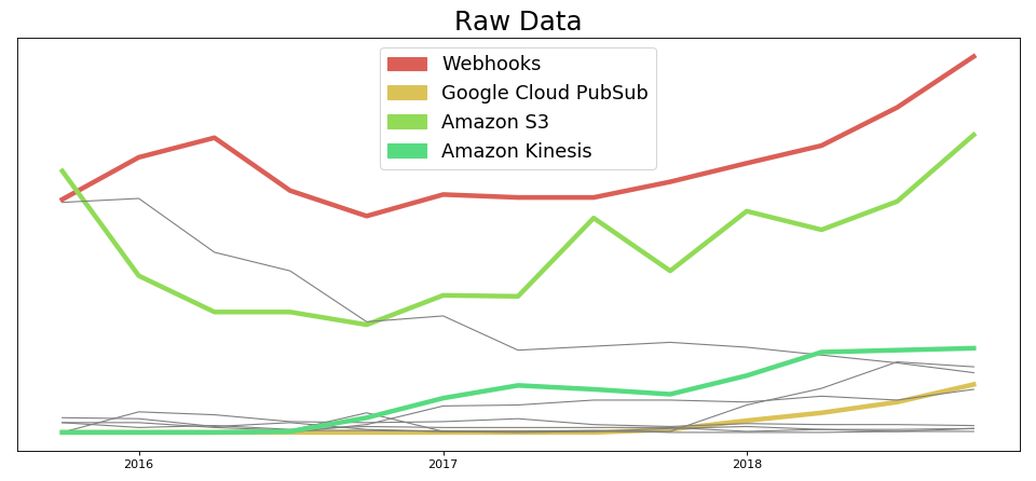
According to Segment, a platform which helps to collect and exchange customer data across many systems, the popularity of webhooks is growing fast.
A typical webhook implementation enables a user of an application to:
- notify an external system (or many systems)
- with an API call(s)
- the moment a particular event occurred.
With such a mechanism in place, an app user doesn’t need to poll for data frequently in order to catch real-time changes.
Sending a request to an external API is only one side of the process. To complete the webhook cycle, the receiving client has to consume it successfully.
In the HTTP world, this usually means responding with 2** status. If it doesn’t, the webhook engine will try again later (a retry policy depends on the policy authors defined).
In our case, Radar sends the event payload we saw when we changed our location to an endpoint provided. Let’s add one to see the webhooks in action.
- Go to Integrations.
- Select test environment and single event delivery.
- Provide an endpoint to be notified. You have a couple of options here. You can:
- spin off a simple web server on your machine and use ngrok to channel the traffic,
- use glitch to deploy your endpoint immediately,
- tap into one of the online webhook catchers like: webhook.site or requestbin
- Paste your unique URL to the form and confirm.
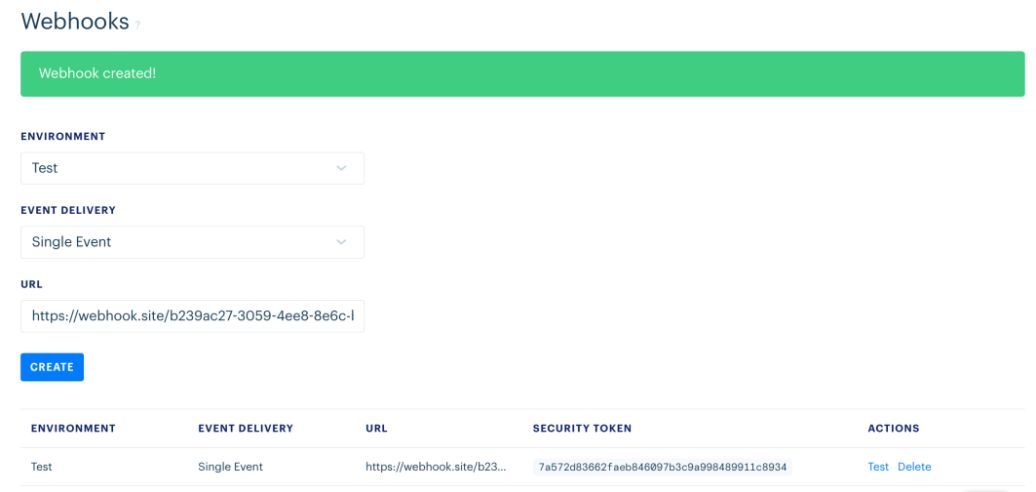
- Click on Test from the ACTIONS column to fire your first event. If you set it up right, you should see the webhook payload as shown in the picture below:

So far so good. The result is quite promising, innit? With some copy’n’paste and a snippet of JavaScript, we’ve covered the geolocation part of our use case. At the current stage, Radar can’t identify users other than with a device ID stored in cookies. To make it more robust, let’s identify user with an email. With Radar’s SDK, it’s a one-liner:
{{CODE}}
Radar.setUserId(“test@example.com”);
{{ENDCODE}}
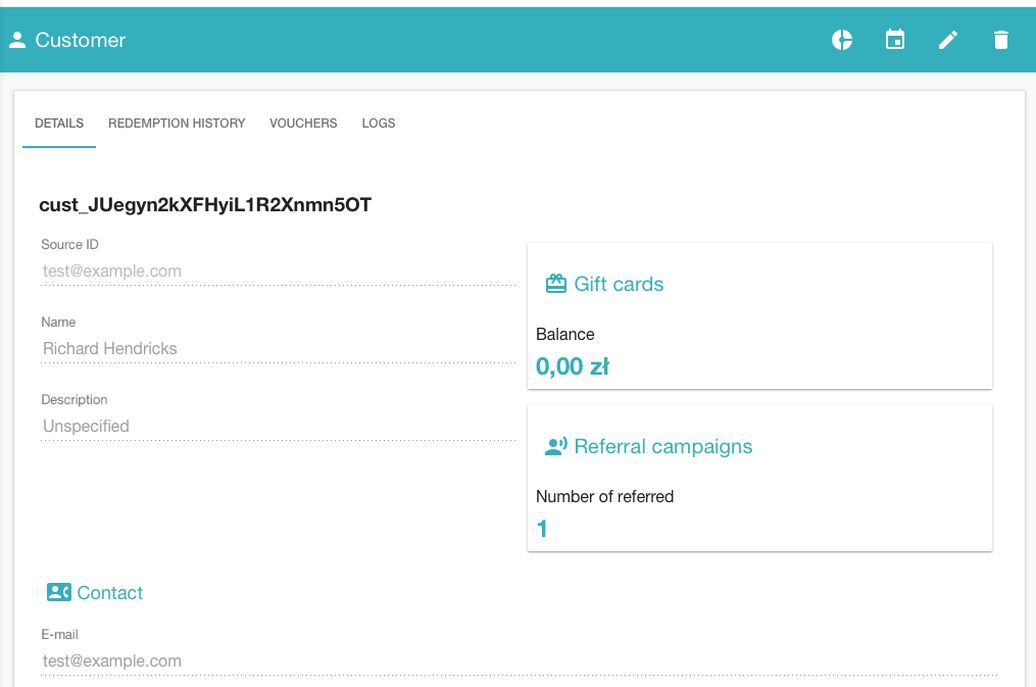
You can immediately see the new ID in the dashboard:
So, now we need to tackle a personal discount requirement - a unique coupon code.
Connecting Radar and Voucherify
Similarly to Radar, Voucherify with its API gives you a flexible couponing feature for a fraction of the cost you would incur if started from scratch.
As we’ll learn soon, it supports other promotional campaigns such as discounts, referral, or loyalty programs which can be delivered with any current of future marketing channel.
To tap into Voucherify personalization features, you need to import users’ data first and keep them in sync.
Voucherify stores customers data in Customer Objects which can be grouped in segments according to personal attributes, location, and Voucherify interaction history.
Let’s assume that you have already imported your test customer into Voucherify and now we’ll see how to sync its location with Radar - without the code.
Zapier – the glue of the web
Imagine if all platforms that expose webhooks were listed in a single directory, with unified structure and ability to connect them like blocks - meet Zapier. Zapier connects more than 1000+ web apps and allow them to work together in the background.

Every Zap starts with a trigger of an event in one of your apps that kicks off your workflow. Here are a few examples from Zapier’s docs:
- Automate your social media presence by sending new RSS items to Facebook as posts;
- Keep projects organized by copying new Trello cards into Evernote;
- Stay in touch with prospects by adding form respondents from Typeform to your mailing list in MailChimp;
- Make sure your team never misses a meeting by notifying a channel in Slack of upcoming Google Calendar events;
- …and many more!
You’ll probably asking now: “Can Zapier help us?”. Yes, it can! Let’s play around with some Zaps to update geolocation changes to Voucherify.
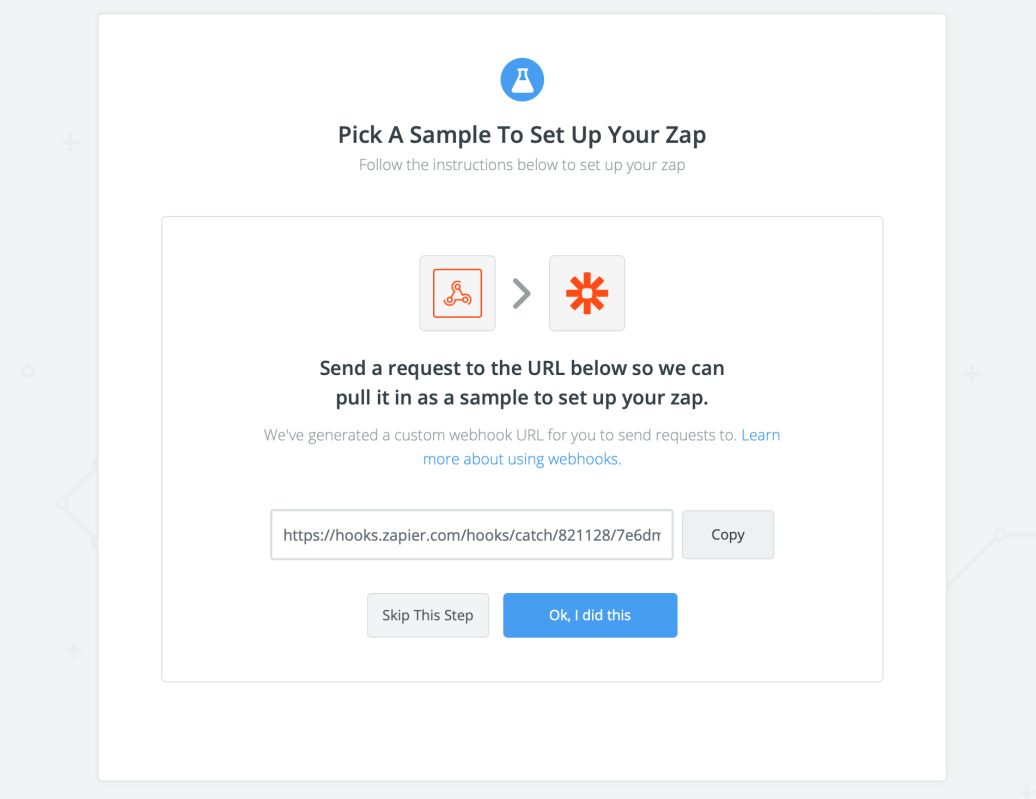
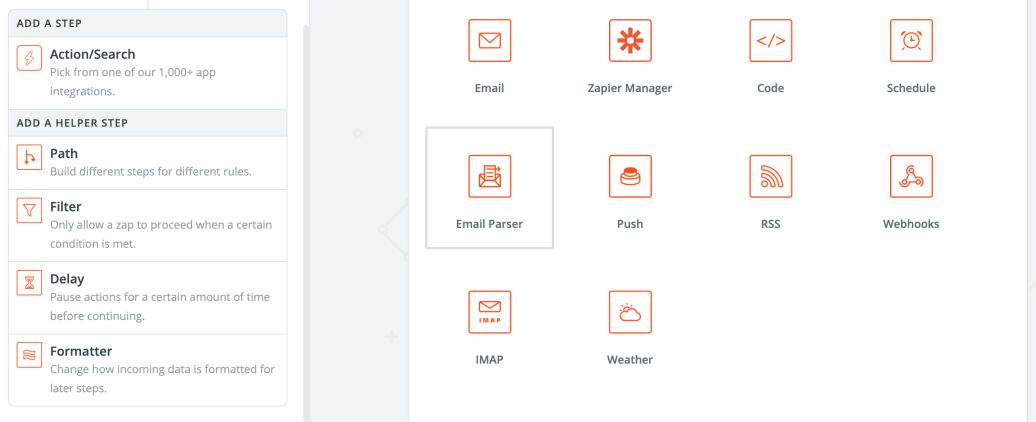
- Click on Make a Zap and select Webhooks.
- With this option, Zapier can create an endpoint (similar to webhook.site) which we can use to consume the webhook from Radar. To do so, choose Catch Hook.
- The next view will give you an endpoint URL which will replace the old one in the Radar webhook setup.
- Paste the link to Radar and fire the test again. If Radar confirms the new endpoint with a green flash bar, go to the next step in Zapier.
- On the next screen, you should notice the payload of your test request
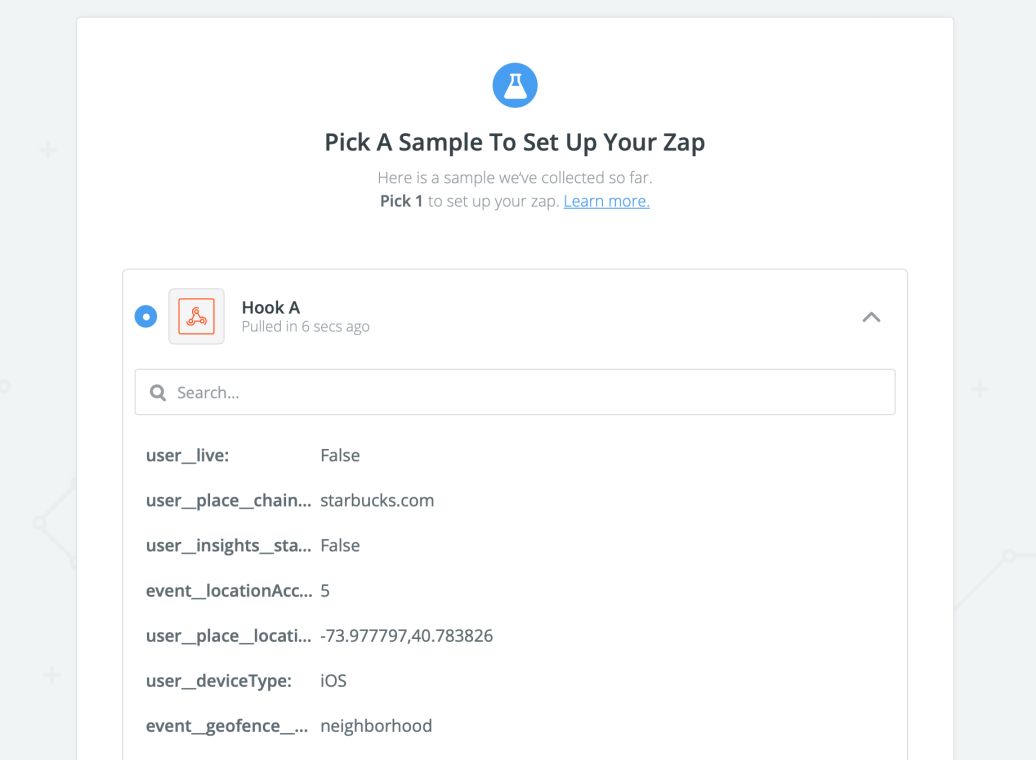
- Confirm the form and the first step of the Zap - trigger - is ready.
Now we need to put consumed messages into work. To complete the Zap, we need at least one action (you can chain multiple platforms with a single Zap).
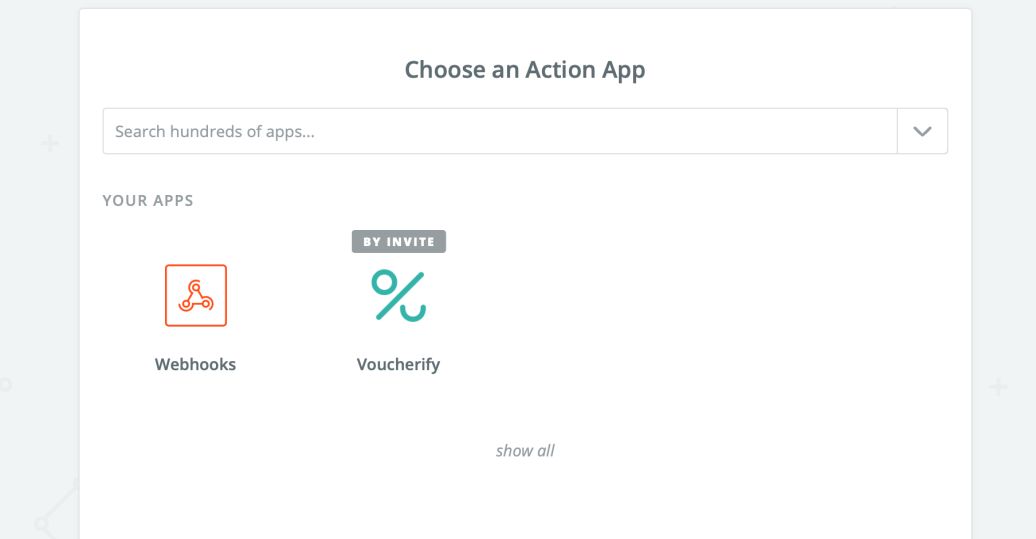
- Choose Voucherify from the Action explorer. Note Voucherify Zap is available “by invite”, here’s the link to get it.
- Select Update Customer option and proceed to the Set Up Template form.
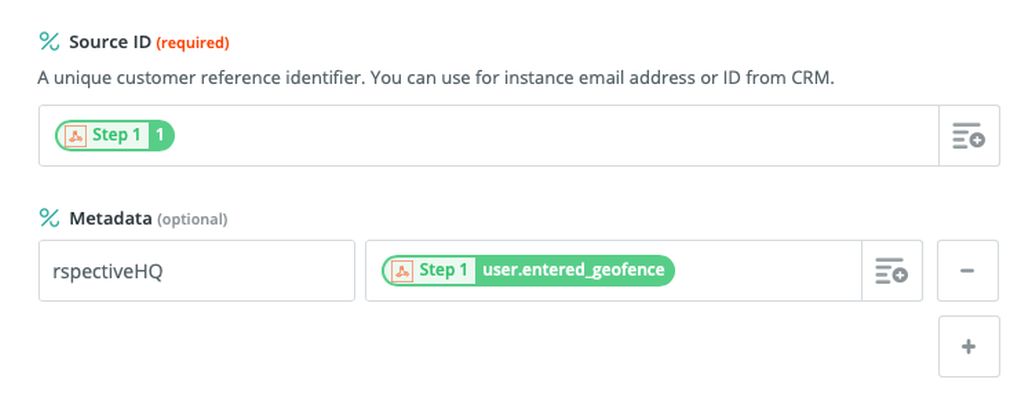
- This is a key part. On this form, Zapier allows you to map the input to output. The editor is both powerful and intuitive. It has a smart search field which allows you to browse the incoming JSON both by keys and values. You can also easily concatenate two or more input fields into one outgoing.
In our case, we just want to identify the customer by the source_id and update a custom field “rspectiveHQ” according to the event, so the mapping looks as follows:
Voucherify: Source ID - Radar: User ID
Voucherify: Metadata -> rspectiveHQ - Radar: Event Type
- Skip the test and complete the form - the ZAP is ON and waiting!
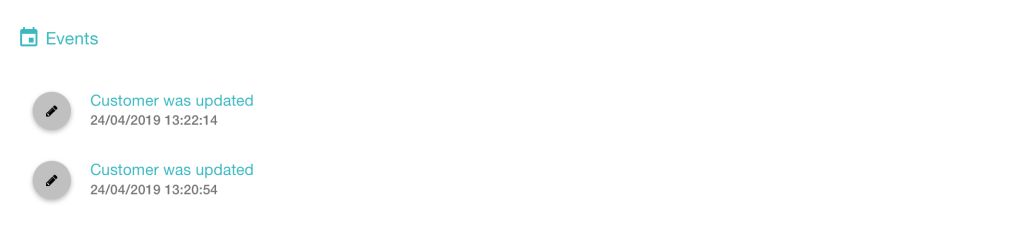
We configured Radar’s webhook and we set Voucherify Zap on. Let’s test if the whole pipeline works. Go to our web app and try changing the location once again to notify Radar’s detector.
Here’s what should follow:
- Radar tracks 2 events, user goes out and in the geofence.
- Zapier catches 2 webhooks accordingly.
- Voucherify tracks to customer profile updates.


Zapier is more than that. When you look at the options of workflow configuration, you’ll notice cogs that allow you to build a fairly complex processes. Helper steps like conditions, filters, or delays will be helpful in crunching and digesting input data and formatting output accordingly.
You can even write custom code (in JavaScript and Python) if you need more flexibility at one of the steps - have I already told you that you can chain a series of trigger-action pairs?
Give Zapier quick start documentation a chance to understand what kind of time-saver it is.
Generating a unique coupon for geolocated users via headless promotion engine
One of the essential features in Voucherify is personalizing discounts based on the customer’s profile, in real-time. This is possible because of the dynamic segments which monitor customer attributes and what they’ve put into a shopping cart, and trigger actions according to some business rules.
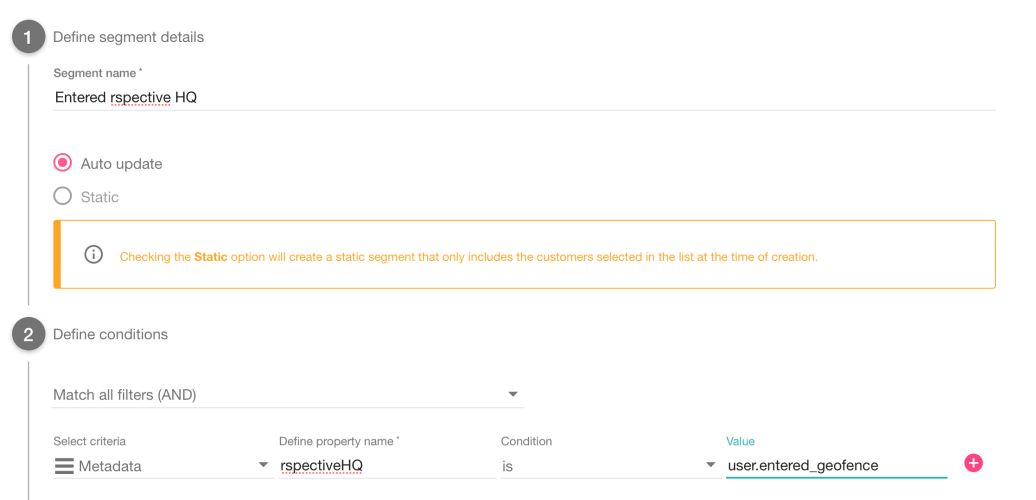
In our case, we’re going to build a segment which checks on our custom field (rspectiveHQ) which, in turn, stores the information if a customer has entered the geofence. We can achieve it by a single endpoint from Voucherify API, but the fastest way is simply to use the dashboard.
Go to Customers and open the segment creator. Now filter out the customer using a corresponding metadata field as in the picture below:
Confirm the filter, hit the reload and you’ll see all the customers matching the segment. You can “ask” your test user to leave the geofence and reload the segment to see if the integration works as expected.
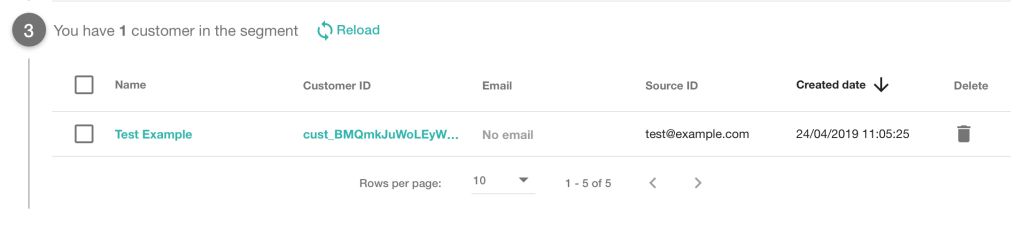
If what you see reflects the reality, save the segment.
The next step is to use the information about location to adapt the discount.
But before we dive into it, I want you to stop for a moment and analyze how much we have achieved so far without writing a single back-end code. At the same time we haven’t closed our solution for change because both Radar and Voucherify expose rich API and headless architecture you can plug whenever you need to.
The final step is to set up a Distribution which will:
- send a unique coupon code
- to a detected customer
- with the predefined channel
To begin with, let’s generate a unique promo code for every user. Let it be a 10% off discount. Go to the campaign creator, choose the Bulk Codes option and follow the steps where you will define:
- type and amount of the discount,
- timeframe,
- codes pattern including length, prefix, suffix, and charset,
- initial number of codes,
- and other details.
The 4th stage of the creator - validation rules - is particularly interesting. This is a place where you can define who and under what conditions can redeem the code. Remember that we want to limit redemption only to those customers who have visited our geofence. We’ll use our segment to complete this step.
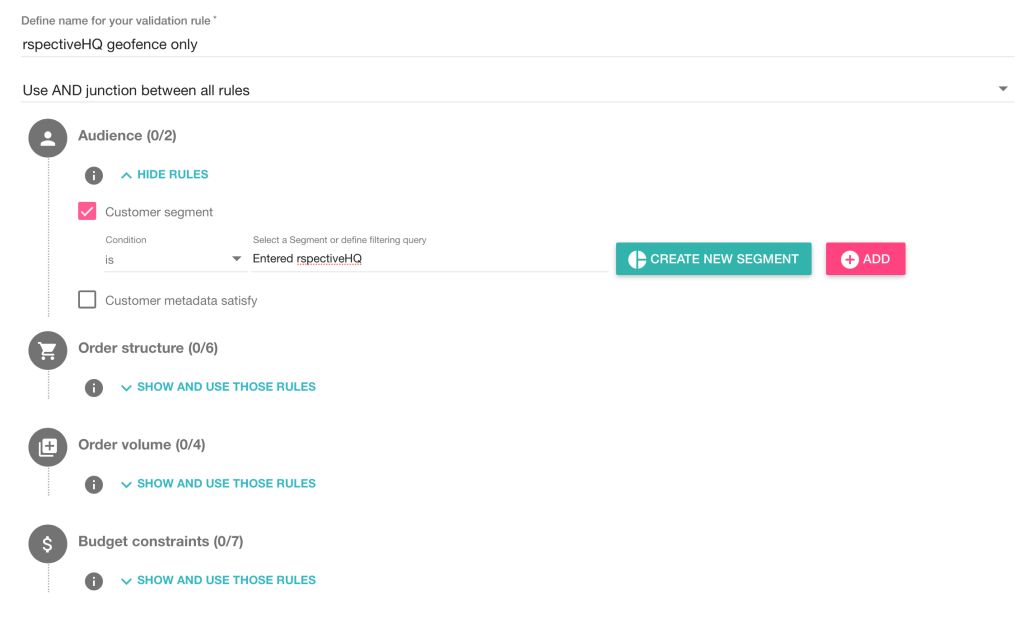
This tool gives you much more filtering options. If you happen to be working on customer acquisition or retention campaigns you might want to check out the validation rules reference because it can save you a ton of code lines.
When Voucherify finishes the bulk generation, you should see them listed:
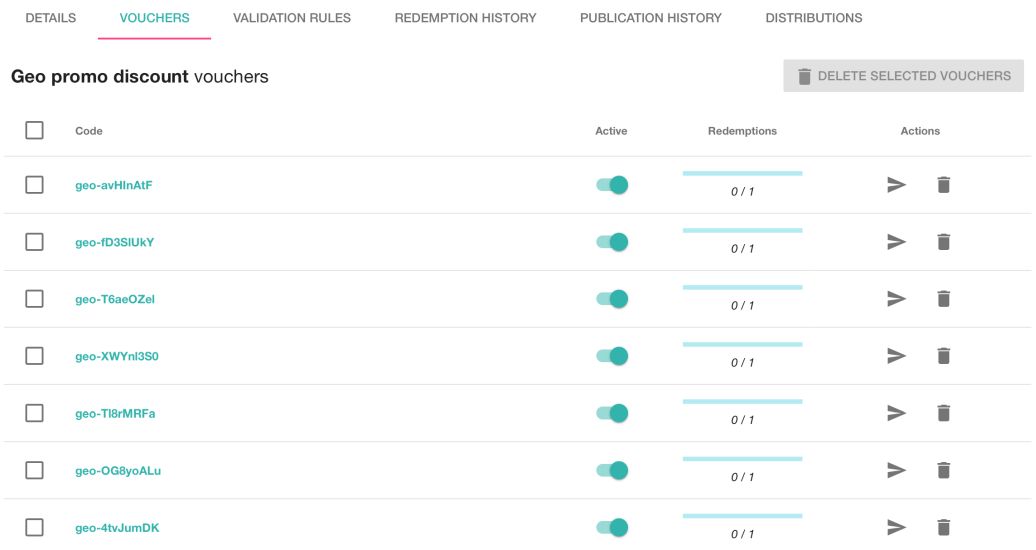
We have the segment and promo codes, now let’s plug it into our marketing outbound channel!
You can implement it with Voucherify API and webhooks, but there’s a quicker way - meet distributions.
This feature allows you to detect a new customer entered (or left) a segment, assign them a unique coupon code, and send it out with email, SMS, push notification, live chat, or social media ads. Additionally, a visual editor helps you create a personalized promotion copy.
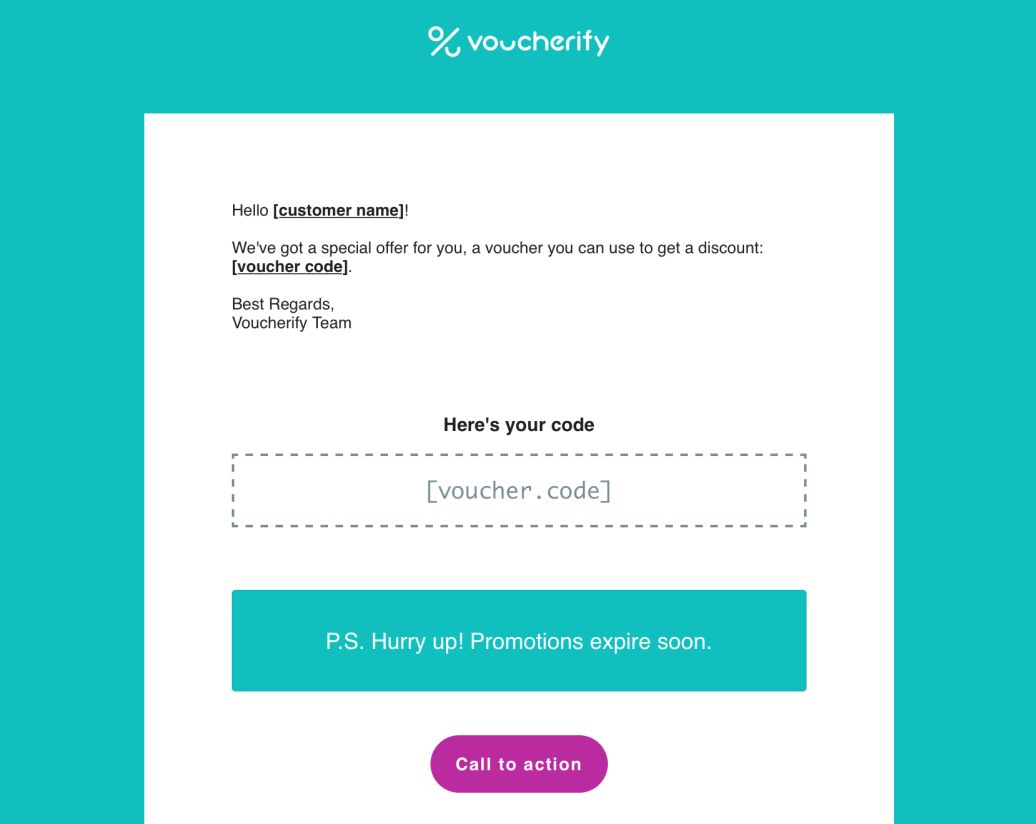
Each channel has its own specific template of the message, let’s see how it looks for push notifications. But to proceed, we need to sign up for a Braze account and connect it with Voucherify with the API key.
Sending a promo code via push notification with Braze
Braze (formerly AppBoy) is one of the leaders of mobile marketing tools. The configuration of our scenario requires 3 steps:
- Creating a push notification campaign.
- Sending coupon codes from Voucherify to Braze.
- Configuring a web push notification in our app.
Push notification campaign
Similarly to Voucherify, Braze can trigger some actions based on real-time changes to customer’s attributes. In this particular case, the distribution we created in Voucherify will set a custom field filled with a unique code from the bulk code campaign.
We’ll define Braze campaign in a way it detects this change and fires off a push notification to an app instance a customer is logged into.
- Open Manage App Group to define an app context.
- Select a web app to get an API public key.

- Now you can go to Campaigns and create a new Push Notification campaign.
- Compose a message which includes the coupon code {{custom_attribute.${coupon}}}, select Test tab and use Send Test to Myself. If you allow for web notification, you should notice a message sliding in the top-right.
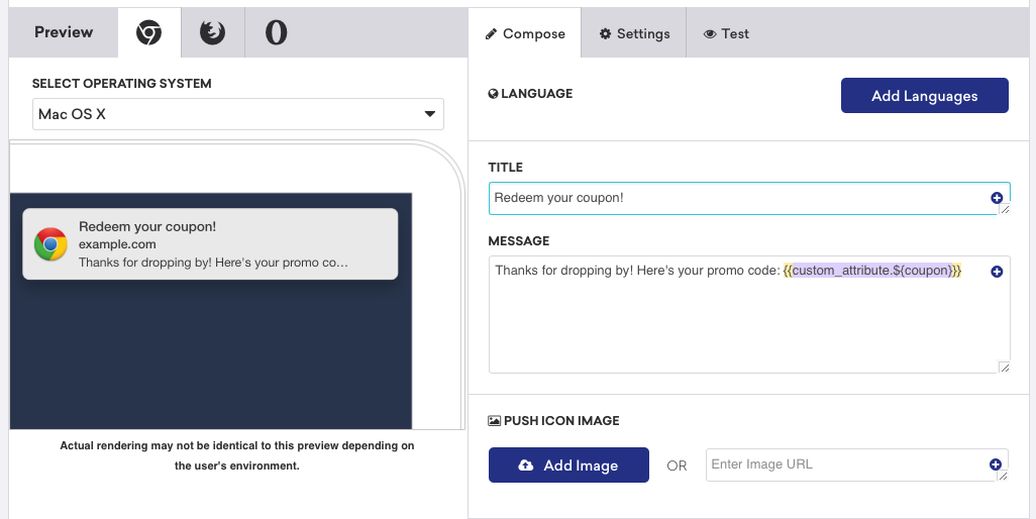
- The coupon code on the test message will be empty because we haven’t added this custom attribute to any of the users. Let’s save the draft of the campaign and create a test user with the code manually.
Create a simple CSV file along the lines:
{{CODE}}
external_id, coupon
test@example.com, xyz
{{ENDCODE}}
And go to User Import to upload it.
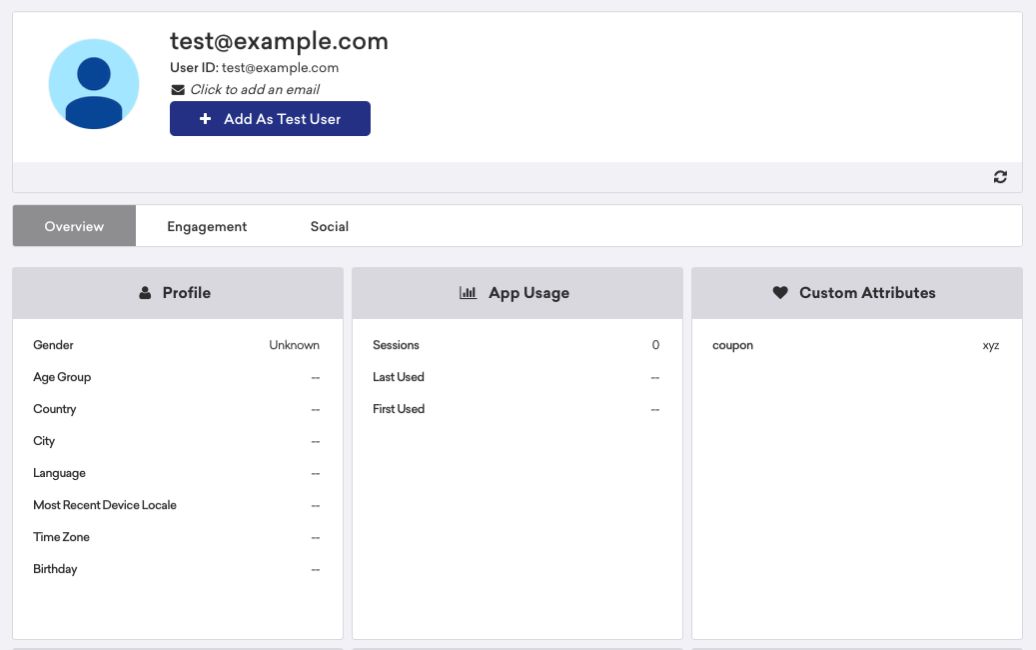
- Now that we have test data and “Override recipients’ attributes…” option checked, we can see the variable substituted.
- In Delivery tab, change the type of the delivery to Action-based one and select Change Custom Attribute Value Trigger as in the picture below:
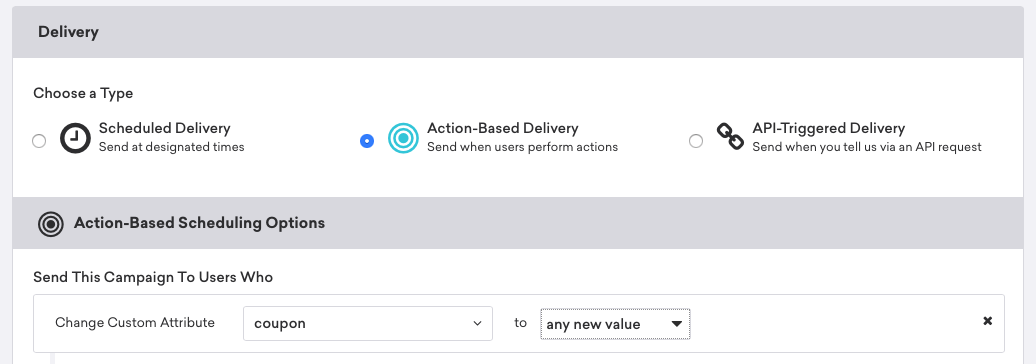
- Enroll “All Users” into the campaign in the next step, and leave out other settings unchanged. When you’re ready, click on Launch Campaign in the bottom-right.
Providing Braze with coupon codes
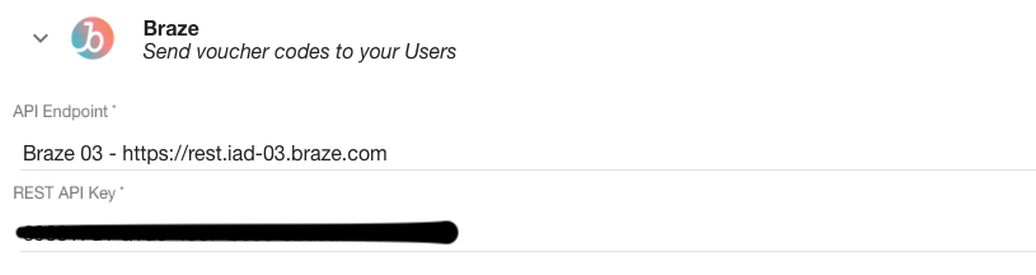
That’s the moment when we should plug Voucherify to Braze. Fortunately, Voucherify supports Braze with a native integration. The only thing remaining to connect these two marketing platforms is to go to Integrations, select Braze, and provide the API endpoint and key.
Now you can re-open the draft of our distribution and complete the last step. Provide the names of custom fields under which Voucherify assigns a unique code and its value:
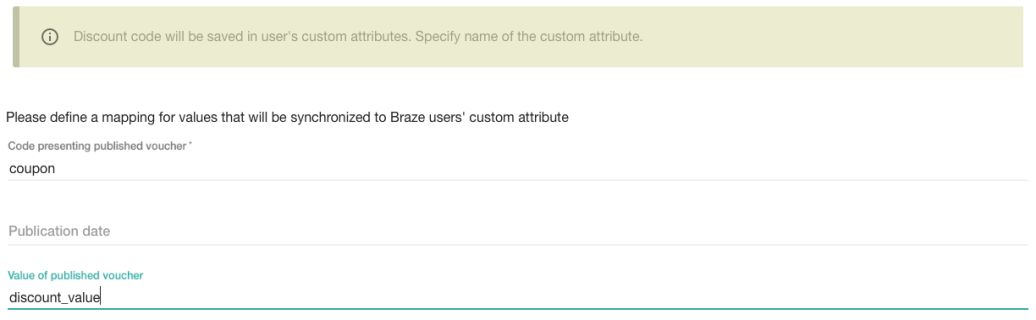
And set it live. From now on, every time Radar detects a geofence event and hence updates customer segment, Voucherify will assign this customer a coupon code and publish it in the user profile in Braze.
The Braze campaign will detect the new field change and will try to send a web notification.
Receiving push notification
We’re almost there! The very last step to finalize our promotion chain is to let push notification flow into our app.
As usual in case of headless platforms, there’s no need to implement it manually. Braze as a true developer-first platform offers an open-source SDK for the web.
To get it up and running, you need to paste a short snippet and fill it with the public API key.
{{CODE}}
<script type="text/javascript">
const test_user = {
first_name : "Mike",
last_name : "Sedzielewski",
email : "test@example.com"
}
+function(a,p,P,b,y){appboy={};appboyQueue=[];for(var
s="initialize destroy getDeviceId toggleAppboyLogging setLogger
openSession changeUser requestImmediateDataFlush requestFeedRefresh
subscribeToFeedUpdates requestContentCardsRefresh
subscribeToContentCardsUpdates logCardImpressions logCardClick
logCardDismissal logFeedDisplayed logContentCardsDisplayed
logInAppMessageImpression logInAppMessageClick
logInAppMessageButtonClick logInAppMessageHtmlClick
subscribeToNewInAppMessages removeSubscription
removeAllSubscriptions logCustomEvent logPurchase isPushSupported
isPushBlocked isPushGranted isPushPermissionGranted
registerAppboyPushMessages unregisterAppboyPushMessages
submitFeedback trackLocation stopWebTracking resumeWebTracking
wipeData ab ab.DeviceProperties ab.User ab.User.Genders
ab.User.NotificationSubscriptionTypes ab.User.prototype.getUserId
ab.User.prototype.setFirstName ab.User.prototype.setLastName
ab.User.prototype.setEmail ab.User.prototype.setGender
ab.User.prototype.setDateOfBirth ab.User.prototype.setCountry
ab.User.prototype.setHomeCity ab.User.prototype.setLanguage
ab.User.prototype.setEmailNotificationSubscriptionType
ab.User.prototype.setPushNotificationSubscriptionType
ab.User.prototype.setPhoneNumber ab.User.prototype.setAvatarImageUrl
ab.User.prototype.setLastKnownLocation
ab.User.prototype.setUserAttribute
ab.User.prototype.setCustomUserAttribute
ab.User.prototype.addToCustomAttributeArray
ab.User.prototype.removeFromCustomAttributeArray
ab.User.prototype.incrementCustomUserAttribute
ab.User.prototype.addAlias
ab.User.prototype.setCustomLocationAttribute
ab.InAppMessage ab.InAppMessage.SlideFrom ab.InAppMessage.ClickAction
ab.InAppMessage.DismissType ab.InAppMessage.OpenTarget
ab.InAppMessage.ImageStyle ab.InAppMessage.TextAlignment
ab.InAppMessage.Orientation ab.InAppMessage.CropType
ab.InAppMessage.prototype.subscribeToClickedEvent
ab.InAppMessage.prototype.subscribeToDismissedEvent
ab.InAppMessage.prototype.removeSubscription
ab.InAppMessage.prototype.removeAllSubscriptions
ab.InAppMessage.Button
ab.InAppMessage.Button.prototype.subscribeToClickedEvent
ab.InAppMessage.Button.prototype.removeSubscription
ab.InAppMessage.Button.prototype.removeAllSubscriptions
ab.SlideUpMessage ab.ModalMessage ab.FullScreenMessage
ab.HtmlMessage ab.ControlMessage ab.Feed
ab.Feed.prototype.getUnreadCardCount ab.ContentCards
ab.ContentCards.prototype.getUnviewedCardCount ab.Card
ab.ClassicCard ab.CaptionedImage ab.Banner ab.ControlCard
ab.WindowUtils display display.automaticallyShowNewInAppMessages
display.showInAppMessage display.showFeed display.destroyFeed
display.toggleFeed display.showContentCards display.hideContentCards
display.toggleContentCards sharedLib".split("
"),i=0;i<s.length;i++){for(var
m=s[i],k=appboy,l=m.split("."),j=0;j<l.length-1;j++)k=k[l[j]];k[l[j]
]=(new Function("return function
"+m.replace(/\./g,"_")+"(){appboyQueue.push(arguments); return
true}"))()}appboy.getUser=function(){return new
appboy.ab.User};appboy.getCachedFeed=function(){return new
appboy.ab.Feed};appboy.getCachedContentCards=function(){return new
appboy.ab.ContentCards};(y=p.createElement(P)).type='text/javascript
';y.src='https://js.appboycdn.com/web-sdk/2.3/appboy.min.js';y.async
=1;(b=p.getElementsByTagName(P)[0]).parentNode.insertBefore(y,b)}(wi
ndow,document,'script');
appboy.initialize('YOUR_KEY', {baseUrl:
"https://sdk.iad-03.braze.com/api/v3"});
appboy.toggleAppboyLogging();
appboy.registerAppboyPushMessages()
appboy.changeUser("test@example.com");
appboy.display.automaticallyShowNewInAppMessages();
appboy.openSession();
</script>
{{ENDCODE}}
And register a service-worker.js:
{{CODE}}
self.importScripts('https://js.appboycdn.com/web-sdk/2.3/service-worker.js');
{{ENDCODE}}
When it’s in place, run another test with “text@example” user in “Add Individual Users” input. Your app should receive a notification with “xyz” promo code.
Now, let’s test if the campaign triggers a push message when you change the coupon field.
First, make sure your campaign is active and the web app is launched. Second, download Braze Postman collection, open User Data catalog, and select User Track - Attributes Example. (If you don’t know Postman, you can catch up here)
Change the endpoint URL to the one you’re assigned to, in my case it’s: https://rest.iad-03.braze.com/
And the request payload to:
{{CODE}}{
"api_key":"YOUR_KEY",
"attributes":[
{
"external_id":"test@example.com",
"coupon":"123"
}
]
} {{ENDCODE}}
Send the request and expect another message with updated coupon code.
Testing all the headless building blocks
To make sure the workflow does what we asked for, just open your app and use the Sensor to “locate” to a different place and then back to the geofence. In a few seconds, you should see the personalized notification on your screen!
Now the user can take their code and put it into the coupon box validated by Voucherify on the backend.
Let’s summarize the wins of headless platforms here:
- In an hour or so, we delivered a working solution for a fairly complex business scenario.
- The code base is super short and simple - which translates into less maintenance overhead.
- Although we don’t have 100% control over the solution, it’s still open for customization thanks to the API access.
- The lack of full ownership is balanced with support from the vendors’ teams and better quality of the tools.
- With webhooks and tools like Zapier you connect and interweave various departments and systems in next to no time.
One thing you need to pay attention to when using multiple SaaS vendors is the fallback. Sometimes a platform is down and you need to instruct your system how to react - e.g., how to store and queue the actions. Developer-friendly platforms however expose interfaces you can use to monitor their API availability and react on time.
On the other hand, super robust fallbacks aren’t necessary for applications in the POC stage after all.
How can headless approach help me?
In a nutshell, by learning how you can leverage headless platforms to build something of value quickly and with reduced cost, you’ll become more valuable on the job market.
It’s not programming languages or frameworks which account for competitive advantage today. It’s often quite different - it’s how businesses can use the available tools to solve their problems with the least possible amount of code. In other words, these are the things which count more than mastering a given tech stack or stacks:
- Knowing how to reduce time to market;
- Overview of lowering maintenance cost techniques;
- Ability to reduce dependencies on individual technologies;
- Overview of current technologies supporting the three above.
Where to look for more headless commerce platforms?
A good starting point can be this list:
Promotions
Catalogue & inventory
Cart
Payment
Messaging
Booking & events
Shipping
General
{{CTA}}
Build composable products with Voucherify
{{ENDCTA}}
FAQs
With its powerful API-first architecture, Voucherify can be quickly integrated into any existing systems and scaled effortlessly as the business grows. It's perfect for brands that want to take full control of their promotional strategies, without the limitations of cookie-cutter solutions and ready plug-ins.

.jpeg)

.jpeg)
.jpeg)